Brand Your Photos: How to Add Logos, Watermarks, and Text Overlays in Seconds

Advertisement
Brand Your Photos: How to Add Logos, Watermarks, and Text Overlays in Seconds
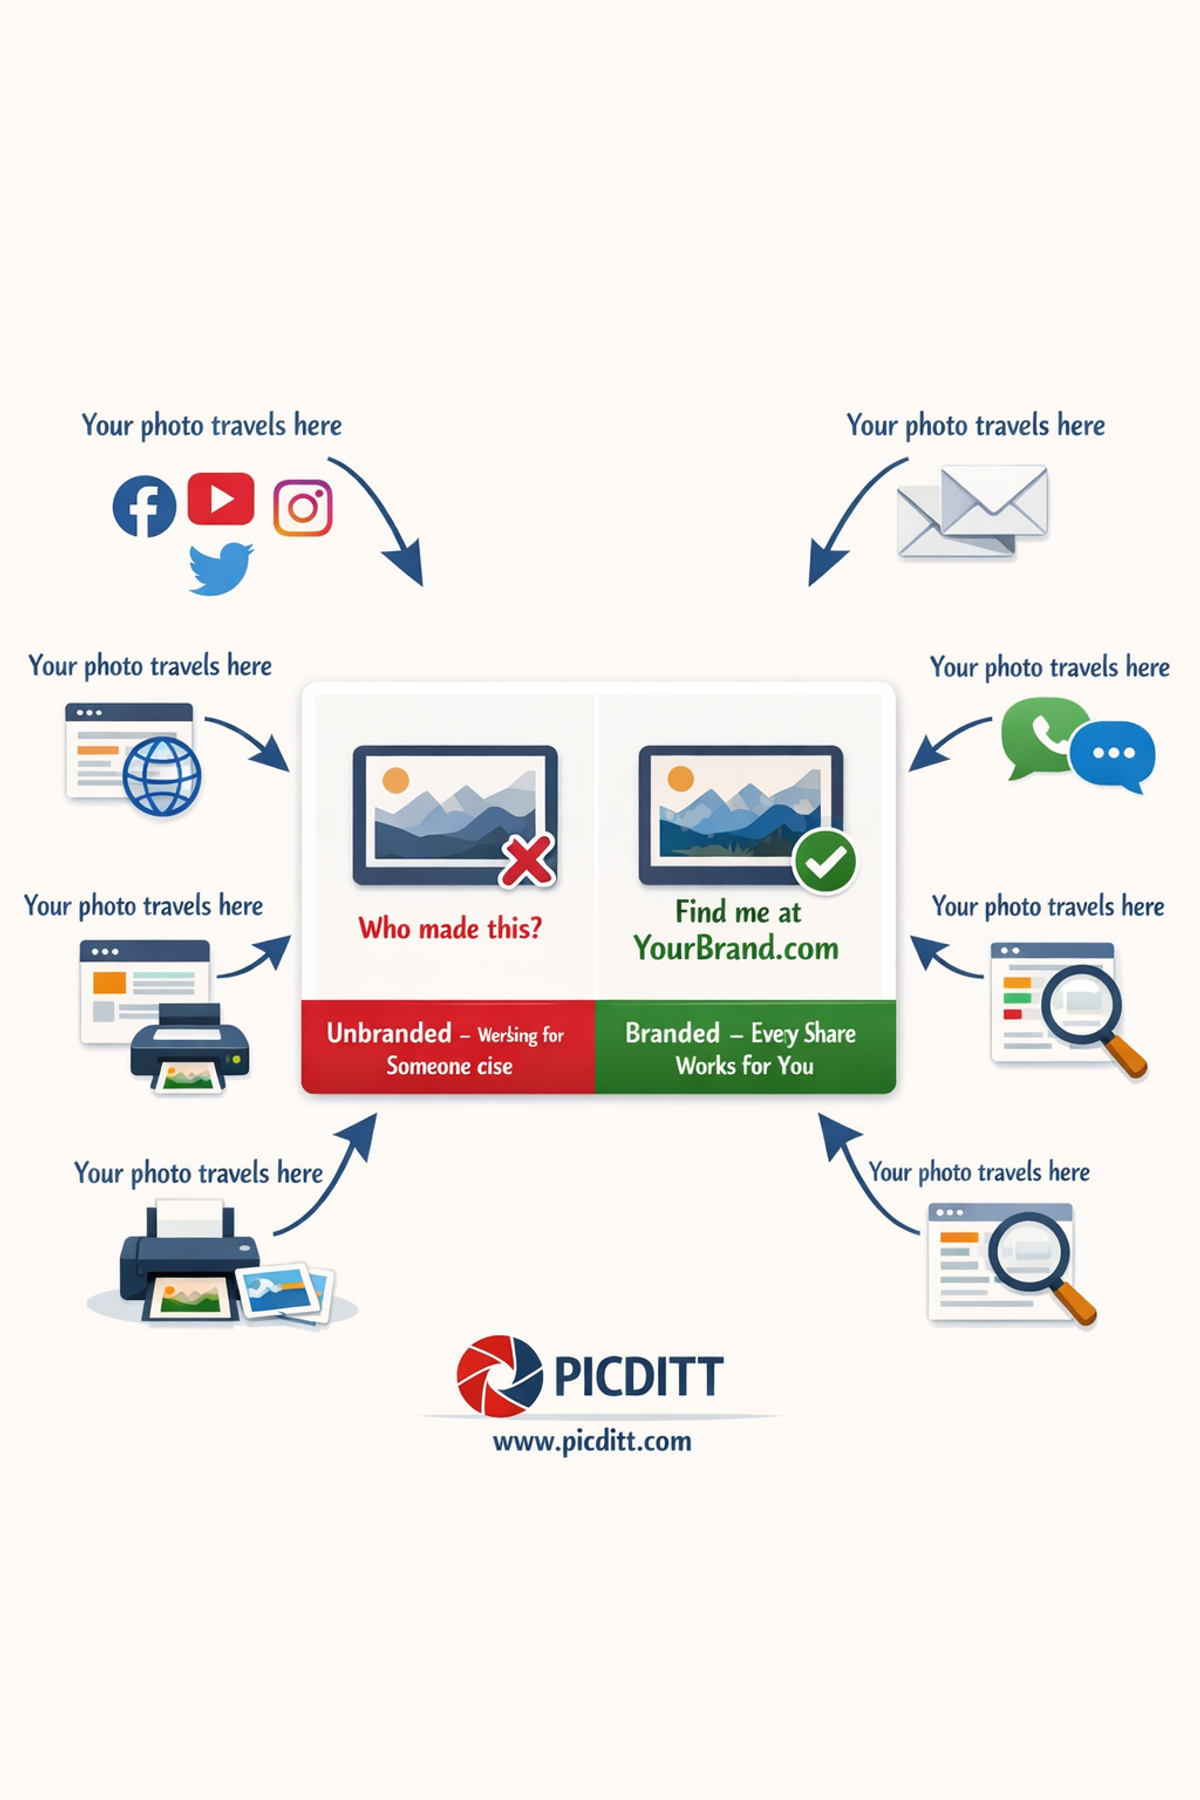
Every photo you share without your brand on it is working for someone else.
When your unbranded photo gets shared on Pinterest, saved to someone's phone, reposted on Instagram, or downloaded from your website, the connection between that image and your business disappears completely. The person who sees it has no idea where it came from, who created it, or how to find more of your work. You created the content. Someone else gets the attention.
Now consider the alternative. The same photo, shared with your logo in the corner and your website URL subtly overlaid. Every share, every download, every screenshot carries your brand. People who discover your photo through someone else's post can find you instantly. Your visual content becomes a self-propelled marketing system.
This is why professional photographers, e-commerce brands, content creators, digital artists, and businesses of every size add logos, watermarks, and text overlays to their photos before sharing them anywhere online. It's not just about protection from theft — though that matters too. It's about owning your visual presence in a world where images travel far beyond their original context.
This complete guide covers everything about adding professional watermarks and brand elements to photos — what to add, where to place it, how to make it look polished rather than amateurish, and how to use the free Picditt Add Logo & Text tool to do it in seconds, completely privately, with no uploads to any server.

Why Branding Your Photos Matters More Than Ever
The Invisible Distribution Problem
When you publish a photo online, you lose control of where it goes. Social media platforms encourage sharing. Pinterest is built entirely around saving and redistributing images. Screenshots are effortless. Downloads are one right-click away on desktop and one long-press away on mobile.
In the early days of the internet, this was mostly a minor inconvenience. Today, it's a fundamental characteristic of how visual content travels — and it creates both a massive opportunity and a significant risk for anyone who creates visual content professionally.
The opportunity: Your photos can reach audiences you would never reach through your own channels. A single image can travel through dozens of accounts, boards, websites, and group chats, accumulating views that dwarf your own follower count.
The risk: Unless your brand is on that image, none of those views connect back to you. The viral photo becomes an asset for the person who shared it, not for the person who created it.
Brand watermarking solves both problems simultaneously. It turns the viral distribution of your content into organic marketing while establishing clear ownership that deters theft and enables attribution.
The Attribution Gap
Studies of visual content online consistently show that the majority of photos shared on social media are divorced from their original source within one or two shares. By the time a photo has been shared three or four times, the original creator is almost never credited.
A branded watermark eliminates this attribution gap. Your website URL, social handle, or business name travels with the image regardless of how many times it gets reshared, screenshotted, or reposted. Every person who sees the image — at any point in its distribution chain — has a direct path back to you.
Protection and Marketing in One Step
The most efficient thing about photo watermarking is that it accomplishes two distinct goals simultaneously:
Protection: A visible brand element on your photo signals ownership, deters casual theft, and provides evidence of your rights in any dispute.
Marketing: The same brand element drives traffic, builds recognition, and turns every share of your content into a brand impression.
Most protective measures are purely defensive — they cost time and money without generating any return. Watermarking is the rare protective measure that actively generates value while protecting your work.
What to Add to Your Photos: A Complete Guide
The Picditt Add Logo & Text tool supports multiple types of brand elements. Understanding what each type communicates and when to use it makes your watermarking strategy significantly more effective.
Text Watermarks
Text watermarks are the most versatile and commonly used form of photo branding. They can contain any combination of:
Copyright notices:© 2025 Your Name or © YourBrand.com 2025
The copyright symbol (©) immediately communicates ownership and intellectual property rights. This is the standard format for photographers, artists, and content creators protecting their work legally.
Website URLs:YourBrand.com or www.YourWebsite.com
A website URL is the most valuable marketing element you can add to a photo. It gives anyone who sees the image — regardless of where or when — a direct path to your business. Every share of your photo becomes a potential referral.
Social media handles:@yourusername or @YourBrandName
For content creators building an audience on Instagram, TikTok, Pinterest, or Twitter/X, your handle is your most important identifier. Adding it to your photos drives follows directly from people who discover your content through shares.
Business names:Your Photography Studio or YourBrand — Quality Products
A business name watermark builds brand recognition with every view. Over time, people who regularly encounter your content begin to associate your business name with the quality of your visual work.
Phone numbers:Call: (555) 123-4567
For service businesses — real estate agents, contractors, photographers offering local services — including a phone number turns every shared photo into a lead generation asset.
Logo Watermarks
A logo watermark overlays your brand's visual mark on the photo. This is the most visually sophisticated form of watermarking because it uses your established brand identity rather than text alone.
Best practices for logo watermarks:
- Always use a PNG file with a transparent background for your logo — a white rectangular background around your logo looks unprofessional on most photos
- Use a white or light version of your logo for most photos — it shows up clearly without competing with the image colors
- Size your logo to occupy 5–15% of the image width — large enough to be recognizable, small enough not to dominate
When to use logo watermarks:
- Portfolio and showcase photos where brand presentation matters
- Social media content where visual brand identity is important
- Product photos for e-commerce where brand consistency is essential
- Marketing materials distributed to clients or partners
Signature Watermarks
Upload a scan or photo of your handwritten signature as a PNG file. Signature watermarks work beautifully for photographers, artists, and creative professionals where a personal, handcrafted quality enhances the brand.
Tile Pattern Watermarks
Tile patterns repeat your watermark — text or logo — across the entire image surface in a grid. The tool supports 2×2, 3×3, 4×4, 5×5, and diagonal tiling patterns.
When to use tile patterns:
- Client proof photos shared before payment is received
- High-value images with significant theft risk
- Any situation where maximum protection outweighs aesthetic considerations
- Stock photo previews

Introducing the Picditt Add Logo & Text Tool
The Picditt Add Logo & Text tool is a free, browser-based photo branding tool that lets you add unlimited text watermarks, logo overlays, copyright notices, social handles, and tile patterns to any photo — with complete customization control and 100% private processing.
Complete Feature Set
15 Professional Fonts
Choose from Arial, Helvetica, Georgia, Times New Roman, and 11 additional professional typefaces. Font selection significantly affects how your watermark feels — clean sans-serif fonts communicate modern professionalism, serif fonts suggest established authority, and script fonts convey creative personality.
Unlimited Colors
Full color picker with RGB and hex input plus popular color presets. Match your exact brand colors for visually consistent watermarks across all your content.
Adjustable Opacity
10% to 100% transparency control. The right opacity depends on your goal — subtle brand presence for portfolio sharing, prominent protection for client proofs.
360° Rotation
Rotate any text or logo element to any angle. Diagonal watermarks at 30–45 degrees provide more coverage and are harder to remove than horizontal placement.
9 Position Presets Plus Drag-to-Place
Quick positioning buttons for all four corners, all four edge centers, and the image center. Plus free drag-and-drop positioning for exact custom placement.
Multiple Simultaneous Watermarks
Add unlimited text and logo elements to a single image, each with its own independent controls. Combine a logo in one corner, a copyright notice in another, and a website URL diagonally across the center.
Tile Pattern Generator
Repeat any watermark in 2×2, 3×3, 4×4, 5×5, or diagonal patterns covering the entire image surface.
100% Private Processing
All processing happens entirely within your browser. Your photos are never transmitted to any external server. No data collection. No account required.
Technical Specifications
Specification
Details
Input Formats
JPG, PNG, WebP, GIF, BMP, TIFF
Output Format
High-quality PNG (lossless)
Maximum Watermarks
Unlimited per image
Font Options
15 professional fonts
Opacity Range
10% to 100%
Rotation Range
-180° to +180°
Position Options
9 presets + drag-to-place
Tile Patterns
2×2, 3×3, 4×4, 5×5, Diagonal
Processing
100% client-side (browser-based)
Privacy
No server uploads, no data collection
Cost
Free forever, no limits
Registration
None required

Step-by-Step Guide: Adding Your Brand to Photos
Step 1: Prepare Your Brand Assets
Before opening the tool, gather the files you'll need:
For text watermarks: Decide on your watermark text — your website URL, copyright notice, social handle, or business name. Keep it concise. © 2025 YourBrand.com contains both copyright notice and URL in a compact, professional format.
For logo watermarks: Export a PNG version of your logo with a transparent background. If you only have a logo on a white or colored background, use a design tool to remove the background first, or use the white version of your logo which typically looks clean on most photos.
Resolution: Logo files should be at least 500px wide for sharp results at most watermark sizes. Higher resolution logos stay sharp even when scaled up for large photos.
Step 2: Open the Tool
Visit https://picditt.com/misc/add-logo-text in any modern browser. Works on desktop, laptop, tablet, and mobile. No account, no installation, instant ready-to-use.
Step 3: Upload Your Photo
Drag and drop your photo onto the upload area or click to browse. Supported formats include JPG, PNG, WebP, GIF, BMP, and TIFF. The tool handles images at any resolution up to the browser's memory capacity.
Step 4: Add Your Text Watermark
Click "Add Text" to create a text watermark element:
- Type your watermark text in the text input field
- Select your font from the 15 available options
- Choose your text color — white with a shadow works on most photos
- Set your font size relative to the image
- Adjust opacity — 30–50% for subtle branding, 60–80% for prominent protection
- Set rotation if desired — 30–45 degrees for diagonal placement
- Position using the preset grid or drag to your preferred location
Step 5: Add Your Logo Watermark
Click "Add Logo" to create a logo watermark element:
- Upload your PNG logo file
- Resize the logo using the size control — typically 8–15% of image width
- Set opacity — logos often look best at 40–60% for professional subtlety
- Position in your preferred corner or location
- The transparent background of your PNG logo will be preserved — no white box around it
Step 6: Add Multiple Elements (Optional)
Unlike single-watermark tools, this tool lets you add unlimited elements. A professional multi-element setup might include:
- Logo in the bottom-right corner at 50% opacity
- Website URL as diagonal text across the center at 25% opacity
- Social handle in the bottom-left corner at 40% opacity
Each element has its own independent controls and can be adjusted or removed without affecting the others.
Step 7: Apply Tile Pattern (Optional)
For maximum protection on high-value photos or client proofs, enable the tile pattern for any of your watermark elements. Select from 2×2 to 5×5 grids or diagonal tiling. The entire image surface gets covered, making the watermark virtually impossible to remove cleanly.
Step 8: Preview and Download
Check the full preview at actual size. Verify:
- Is the watermark visible in both light and dark areas of the photo?
- Is the opacity appropriate for the intended use of this photo?
- Is the logo rendering cleanly without artifacts?
- Does the overall branded photo look professional?
Click Download when satisfied. Your branded photo saves as a high-quality PNG instantly — no watermark on your watermarked photo, no account required.

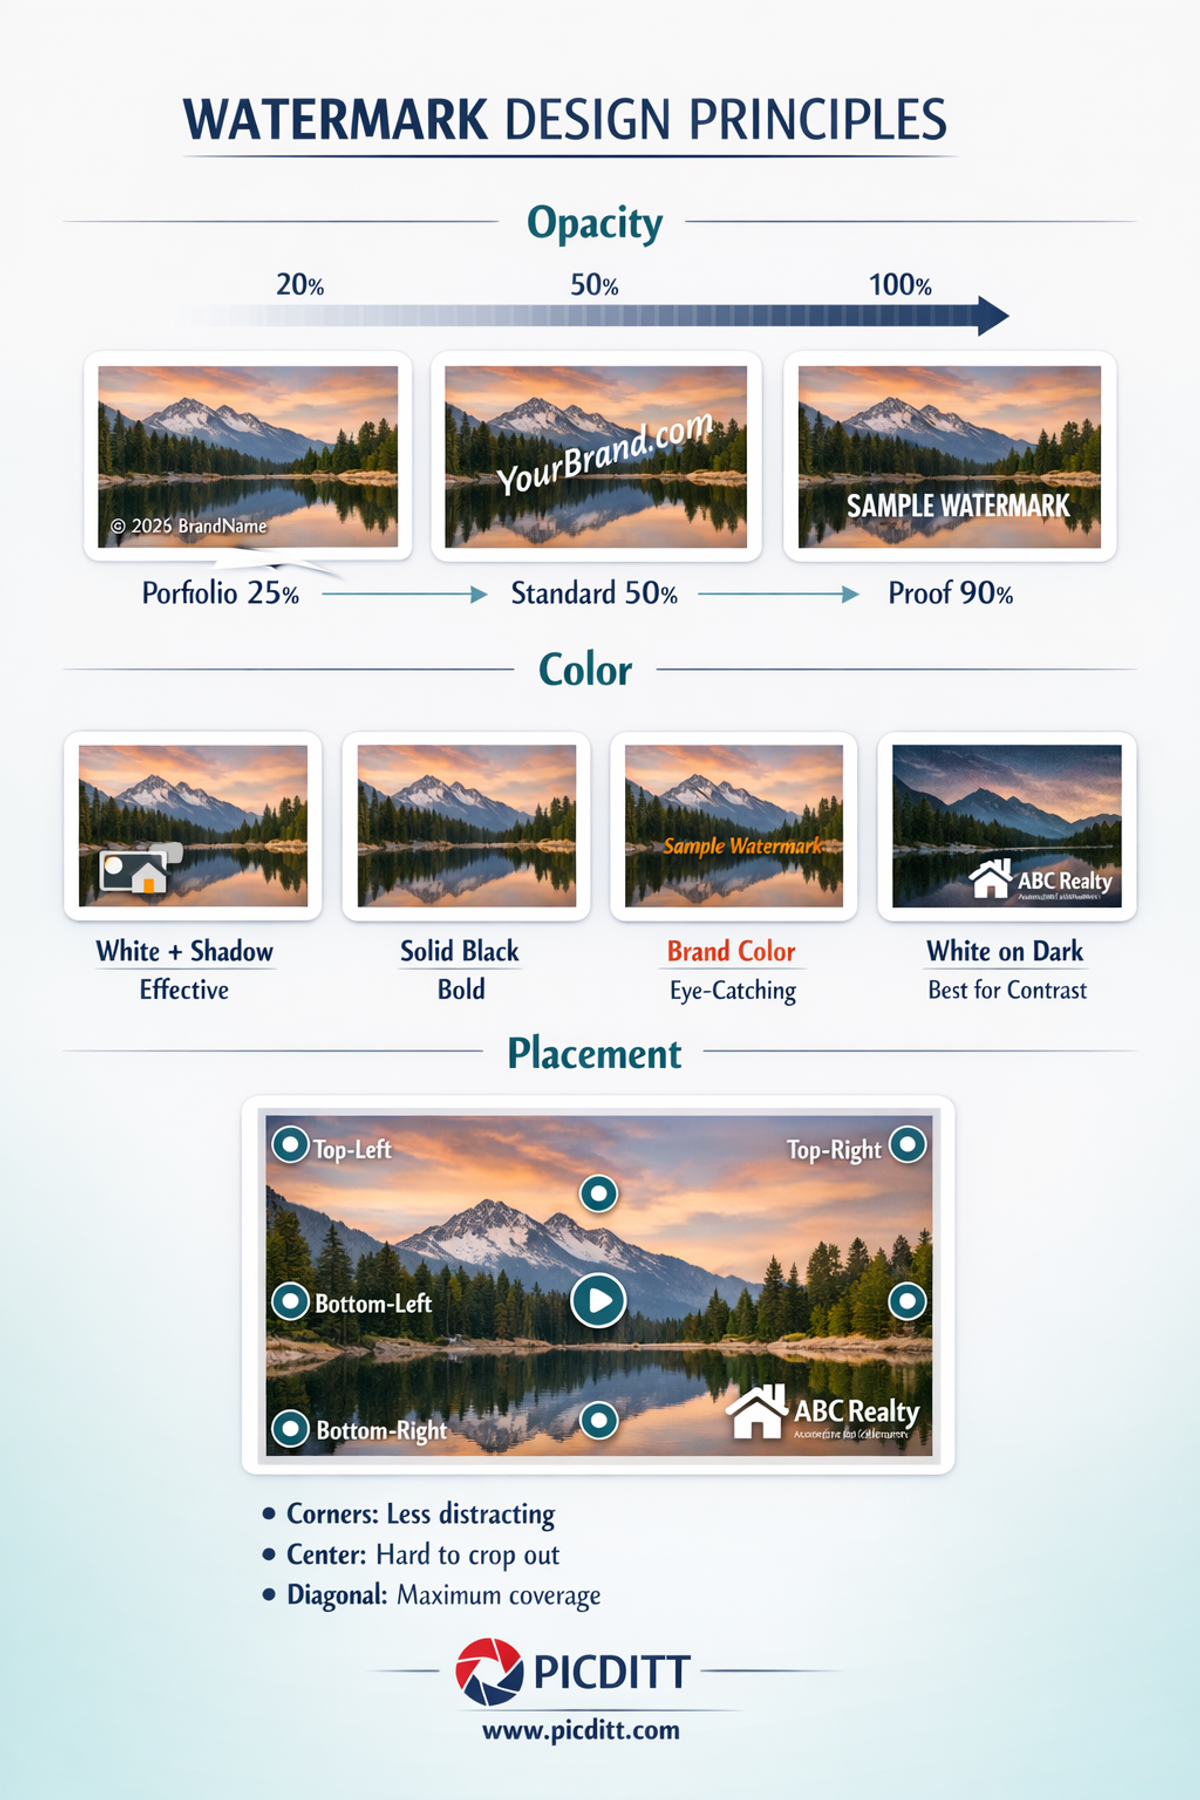
Watermark Design: Making It Look Professional
The difference between a watermark that looks professional and one that looks amateurish comes down to a few key design decisions.
The Opacity Sweet Spot
Opacity is the single most important factor in watermark appearance. The most common mistake is using too high an opacity — a solid, fully opaque watermark dominates the photo and distracts from the content. The goal is a watermark that is clearly present without competing with the image.
Use Case
Recommended Opacity
Why
Portfolio and showcase photos
20–30%
Subtle presence — image quality is paramount
Social media content
30–40%
Visible but not distracting
Standard MLS and public listings
30–50%
Clear attribution without affecting buyer experience
Client proof photos
60–80%
Prominent enough to deter use before payment
Preview images (pre-agreement)
80–100%
Maximum protection on unconfirmed work
Color Strategy
White watermarks work on most photos because white has high contrast against mid-tones and shadows while remaining subtle on light backgrounds (especially with reduced opacity). Add a drop shadow to maintain visibility on light areas.
Black watermarks work best on light, airy photos — white backgrounds, bright lifestyle photography, flat-lay product shots.
Brand colors create the strongest brand identity but require more careful placement — a colored watermark on a similarly-colored background disappears.
Pro technique: Use white text with a subtle black drop shadow for maximum versatility. This combination maintains visibility across the entire dynamic range of any photo regardless of the background.
Font Selection Psychology
Your font choice communicates your brand personality:
Font Style
Brand Personality
Best For
Clean sans-serif (Arial, Helvetica)
Modern, minimal, professional
Tech, e-commerce, contemporary brands
Classic serif (Times New Roman, Georgia)
Established, authoritative, traditional
Law firms, finance, luxury, publications
Script/cursive
Creative, personal, handcrafted
Photographers, artists, boutique brands
Bold condensed
Strong, impactful, confident
Sports, fitness, bold consumer brands
Strategic Placement
Corner placement is the most common choice but also the easiest to crop out. Bottom-right is conventional — it's where the eye naturally rests after viewing an image, and it's where a photographer's signature traditionally appears.
Center placement cannot be cropped out but affects the viewing experience most significantly. Reserve this for client proofs or high-theft-risk situations.
Off-center diagonal strikes the best balance — covers a significant area of the image, difficult to crop, and visually less intrusive than a full-center placement. Placing the diagonal watermark over the most important subject of the photo (a face, a product, a key feature) provides the strongest protection.
Avoid edges where possible — images frequently get cropped at edges when displayed in different formats and contexts.
Use Cases: Who Uses Photo Branding and Why
Professional Photographers
Photography is perhaps the most obvious profession for photo watermarking. Photographers watermark for two distinct reasons — protection and marketing — and both are equally important.
Portfolio protection: Photographers share their best work online to attract clients. Unprotected portfolio images are regularly downloaded and used in blog posts, social media, and even commercial work without permission or payment. A watermark with your studio name and website URL deters casual theft and enables attribution even when images are shared without permission.
Client proofs: Before a client approves and pays for a shoot, photographers share preview or proof images. These should always carry prominent watermarks — typically 60–80% opacity tile patterns — to prevent clients from simply using the proofs without purchasing the full resolution files.
Social media marketing: When photographers share their work on Instagram, Pinterest, or Behance to attract new clients, a subtle watermark with their handle or website turns every share and save into a potential client referral.
E-Commerce and Product Sellers
Product photography is expensive and takes time to produce well. For online sellers, it represents a significant investment — and competitors regularly steal product photos to use on their own listings.
On platforms like Amazon, eBay, and Etsy, watermarking product photos deters direct competitors from copying your listings. For Shopify and independent store owners, branded product photos that get shared on Pinterest and social media drive traffic back to your store specifically rather than to a competitor using the same photos.
Content Creators and Influencers
For content creators, every piece of content they produce is a marketing asset. When an influencer's photo gets shared across Pinterest boards, Facebook groups, or blog posts, a watermark with their handle turns that distribution into follower acquisition.
The most successful content creators treat their watermark as part of their visual identity — consistent placement, consistent style, consistent font. Viewers who regularly see a particular watermark style begin to associate it with quality content from that creator before they even read the name.
Digital Artists and Illustrators
Digital artwork is among the most frequently stolen content online. Artists share their work to build reputation and attract commissions, but unprotected work gets downloaded and redistributed constantly — sometimes even sold by thieves on print-on-demand platforms.
Watermarking digital art requires a different approach than photography. The watermark must be visible enough to make the art unusable for printing or commercial use, but subtle enough that it doesn't prevent the work from being appreciated as art. This typically means diagonal placement across the main subject at 40–60% opacity, combined with a subtle copyright notice at reduced opacity in a corner.
Businesses and Marketing Teams
Any business that creates visual content for marketing — product shots, lifestyle photography, infographics, branded images — benefits from consistent watermarking before distribution. When your marketing photos get used by journalists, bloggers, or partners without explicit permission, a watermark ensures your brand appears even in unauthorized uses.
For businesses in competitive industries where competitor intelligence gathering is common, watermarking images used internally — in presentations, proposals, and documents — adds a layer of confidentiality marking.

Advanced Watermarking Strategies
The Two-Layer Approach
The most effective watermarking strategy for professional photographers and content creators combines two complementary watermark types on every image:
Layer 1 — Visible brand watermark (20–40% opacity):
Your logo or business name in a corner or subtle diagonal placement. This is the marketing layer — visible enough to be noticed and create brand recognition without distracting from the image content.
Layer 2 — URL or handle watermark (15–25% opacity):
Your website URL or social handle at very low opacity, perhaps diagonally placed. This is the attribution layer — nearly invisible on casual viewing but present and searchable for anyone looking at the image closely.
This two-layer approach ensures brand recognition for casual viewers while providing actionable attribution information for anyone who wants to find the source.
Consistent Brand Standards
Create a documented watermark specification for your business:
- Font: [Specific font name]
- Color: [Hex code]
- Opacity: [Percentage]
- Position: [Corner/diagonal/center]
- Size: [Percentage of image width]
Apply these specifications identically across every photo you brand. Consistency is what transforms a watermark from a random protective mark into a recognizable brand signature that builds recognition over time.
Platform-Specific Adjustments
Different platforms display and crop images differently. Adjust your watermark placement accordingly:
Instagram square posts: Keep watermarks away from the edges — Instagram's profile grid view crops photos to squares and the edges are often lost.
Pinterest: Pinterest images are displayed tall (portrait orientation). Ensure your watermark is visible in the upper portion of the image since the bottom may be cut off in pin previews.
Twitter/X: Images often display cropped in the feed. Place watermarks in the center-left or center area to ensure visibility in feed previews.
Facebook: Cover photos and profile images get heavily cropped. For any Facebook-specific images, center your watermark or use a tiled pattern.
Frequently Asked Questions
What is the best font for a photo watermark?
For most professional applications, clean sans-serif fonts like Arial or Helvetica produce the cleanest, most readable watermarks at low opacity. For photography and creative work, a serif font like Georgia adds an elegant, professional quality. Avoid decorative or script fonts for text-heavy watermarks like URLs — they become illegible at small sizes and low opacity.
Should I use a text or logo watermark?
For maximum marketing effectiveness, use both. A logo watermark builds visual brand recognition — people begin to associate your logo with quality content. A text watermark with your URL or handle provides actionable attribution — people can act on it by visiting your site or following your account. The Picditt tool lets you add both simultaneously with independent controls for each.
Does watermarking prevent all photo theft?
No. A skilled photo editor with enough time and motivation can remove most watermarks using cloning, inpainting, or AI tools. However, watermarks prevent the vast majority of opportunistic theft — the casual competitors, scammers, and bloggers looking for easy-to-use images. Tiled patterns provide the strongest protection because removing them requires extensive editing that degrades the photo quality significantly.
What opacity level produces the most professional-looking watermark?
For portfolio and public-facing photos, 25–40% opacity produces the most professional appearance — clearly present without dominating the image. For client proofs, 60–80% is appropriate. The specific right opacity also depends on what's in your photo — a watermark at 35% opacity looks very different on a dark dramatic landscape versus a bright white-background product shot. Always check the preview across the full range of tones in your image.
Can I add my watermark to multiple photos using the same settings?
Currently the tool processes one photo at a time. For consistent watermarking across multiple photos, set up your watermark with your preferred settings on the first photo and note those settings (font, color hex code, size percentage, opacity, rotation, position) for reference. Apply the same settings to subsequent photos. Since all processing happens locally without server uploads, processing multiple photos in parallel tabs works smoothly.
Does the tool work on smartphone photos?
Yes. The tool is fully mobile-responsive and works in any modern mobile browser on iOS and Android. You can upload photos directly from your camera roll, add watermarks, and download the branded image directly to your photo library — all within your browser without installing any app.
What happens to my photos after I download the watermarked version?
Nothing — because your photos never leave your device. The Picditt Add Logo & Text tool processes everything 100% within your browser using client-side JavaScript. There is no server, no upload, and no stored copy anywhere other than your own device. The original photo remains unchanged in your files, and the watermarked PNG downloads to your device's storage.
Can I use this for commercial purposes?
Yes. The tool is completely free for all uses including commercial photography, business branding, e-commerce product photos, and professional client work. There are no usage limits, no subscription requirements, and no restrictions on commercial application.

Final Thoughts: Every Photo Is a Brand Impression
The photos you share online are working constantly — appearing in search results, getting shared across social platforms, saved to mood boards, screenshot into messaging apps. Each one is an opportunity to reinforce your brand identity and drive people back to your business.
Without watermarking, that opportunity is lost the moment someone saves your image. With professional watermarking, every appearance of your photo — regardless of where or how it gets there — carries your brand, your URL, and your identity.
The free Picditt Add Logo & Text tool makes professional photo branding accessible to everyone. Fifteen fonts, unlimited colors, adjustable opacity, 360° rotation, drag-and-drop positioning, multiple simultaneous watermarks, tile patterns — everything you need to brand your photos like a professional, processing entirely in your browser with complete privacy, at no cost.
Your photos are working for you or they're working for someone else. Make them work for you.
Brand Your Photos Free — No Upload, No Watermark on Output →
Ready to Try It Yourself?
Use this tool for free — no signup, no download, no watermarks.
Open Free ToolYou Might Also Like

Protect Your Privacy: How to Blur Faces and Sensitive Info in Photos (Free Online)
Protect your privacy by blurring faces, text, and sensitive data in images. Learn how to use a free online tool to pixelate or blur photos instantly.
Read More →
Protect Your Listings: How to Watermark Real Estate Photos Quickly (Free & Professional)
Real estate photos get stolen, reposted, and used by competitors every single day. This complete guide shows real estate agents, photographers, and property managers how to watermark listing photos quickly and professionally using a free, 100% private, browser-based tool — with text watermarks, logo overlays, tiled patterns, and custom opacity, all without uploading your images to any server.
Read More →
Free Universal Image Converter — Change Any Image Format Online Instantly
Convert images between any format — JPG, PNG, WebP, GIF, HEIC, and BMP — completely free. Batch convert multiple files, adjust quality settings, and download instantly. All processing happens in your browser for complete privacy.
Read More →