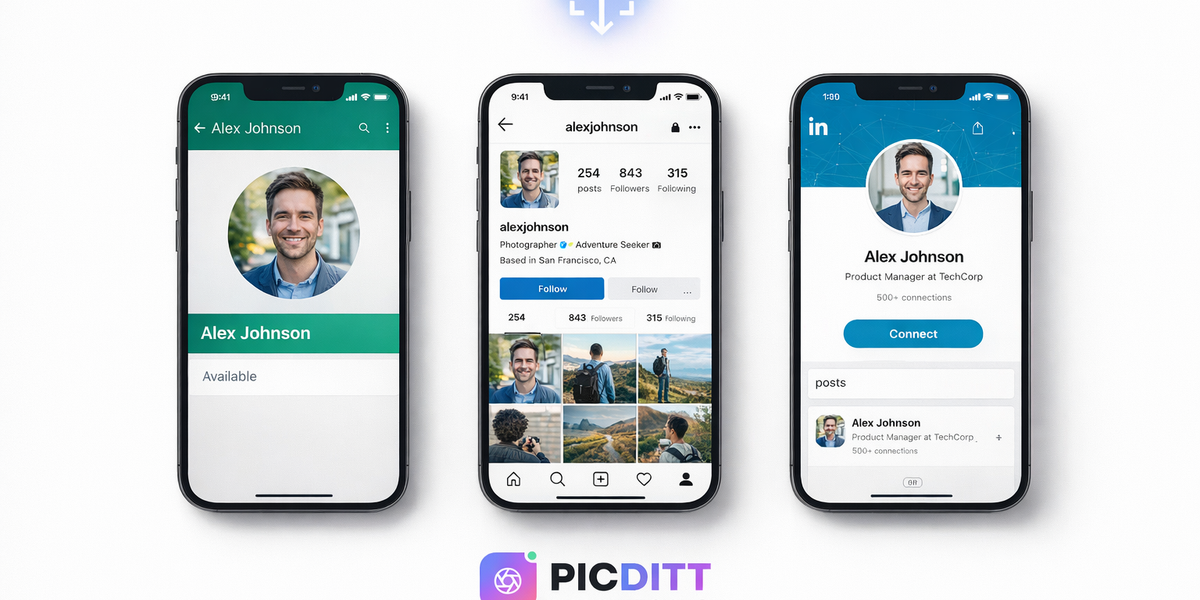
Fix Your Profile Picture: How to Zoom and Resize Photos Online (WhatsApp, Instagram, LinkedIn)
Advertisement
Fix Your Profile Picture: How to Zoom and Resize Photos Online (WhatsApp, Instagram, LinkedIn)
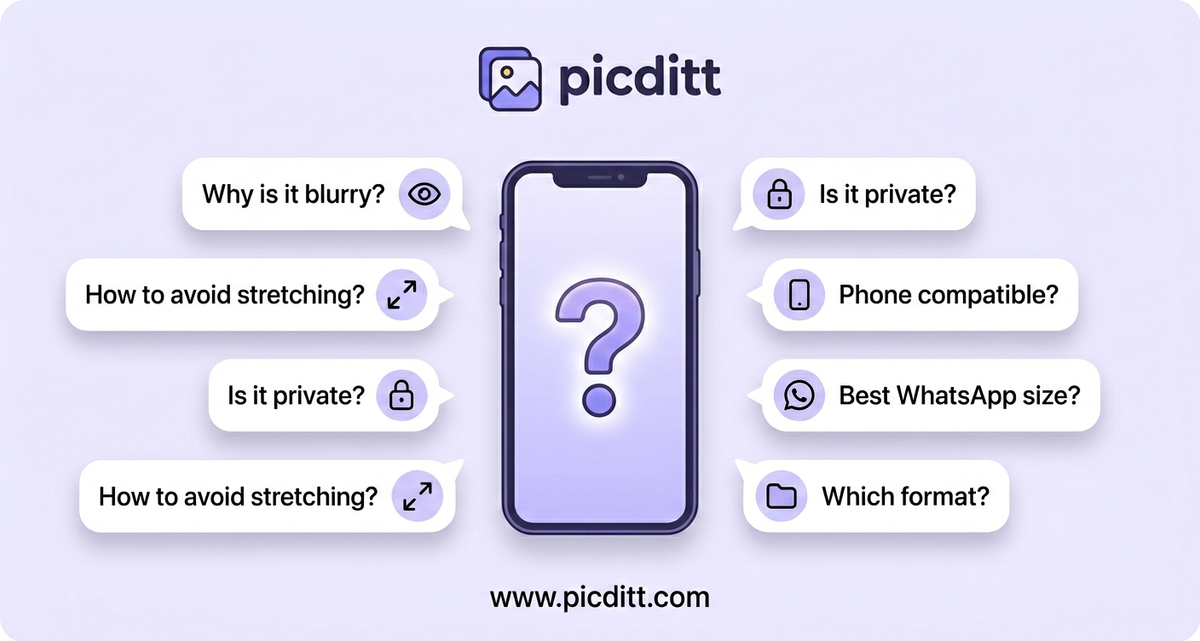
Your profile picture is the first thing people see when they find you online. It appears on every message you send, every comment you leave, every connection request you make. It's your digital face.
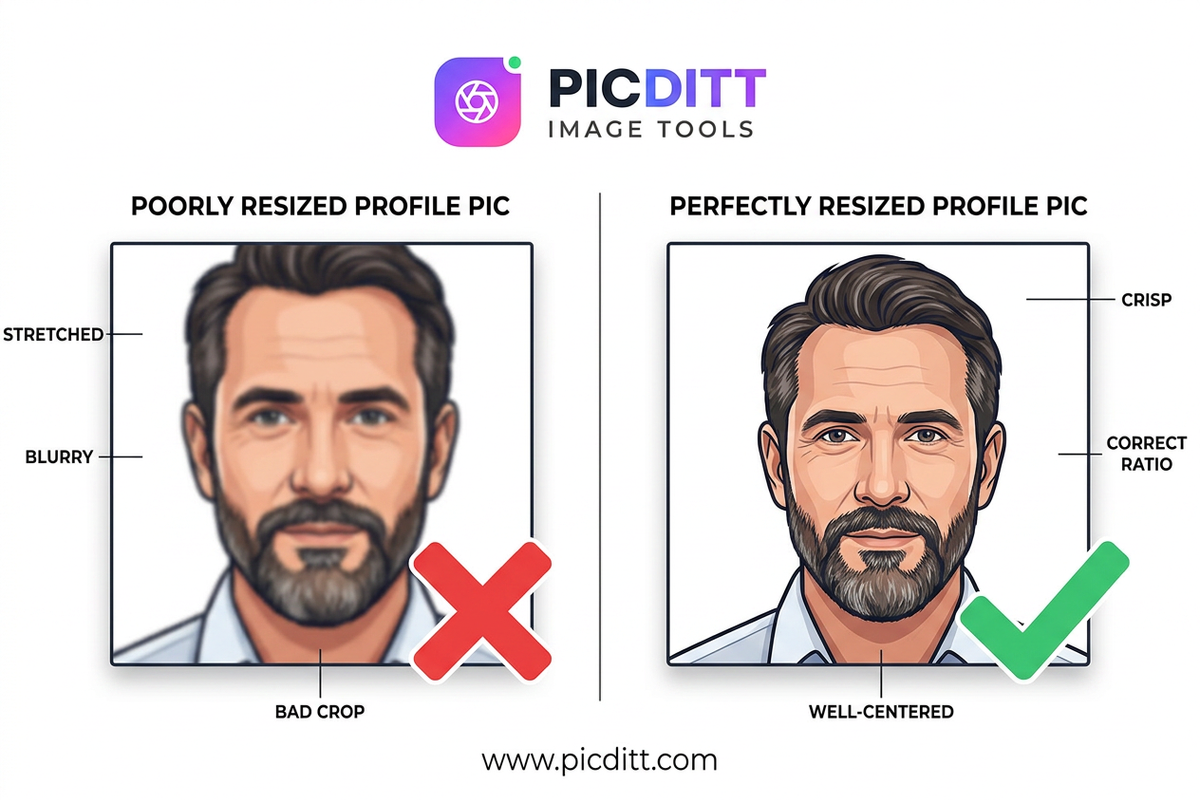
So when it's blurry, stretched, awkwardly cropped, or the wrong size entirely — it matters. It looks unprofessional. It undermines the impression you're trying to make, whether you're a job seeker on LinkedIn, a creator on Instagram, or simply someone who wants their WhatsApp to look right.
The frustrating part? The fix is not complicated. You don't need Photoshop. You don't need design experience. You just need to understand what each platform actually requires and have the right tool to resize your photo to match.
That's exactly what this guide covers. By the end, you'll know the correct dimensions for every major platform, understand why photos go wrong in the first place, and know how to use the free Picditt Zoom & Resize tool to fix any photo in under a minute — with no uploads to servers, no watermarks, and no cost.
Why Profile Pictures Go Wrong: The Root Causes
Before jumping to solutions, it helps to understand exactly why profile pictures end up looking bad in the first place. There are three main culprits.
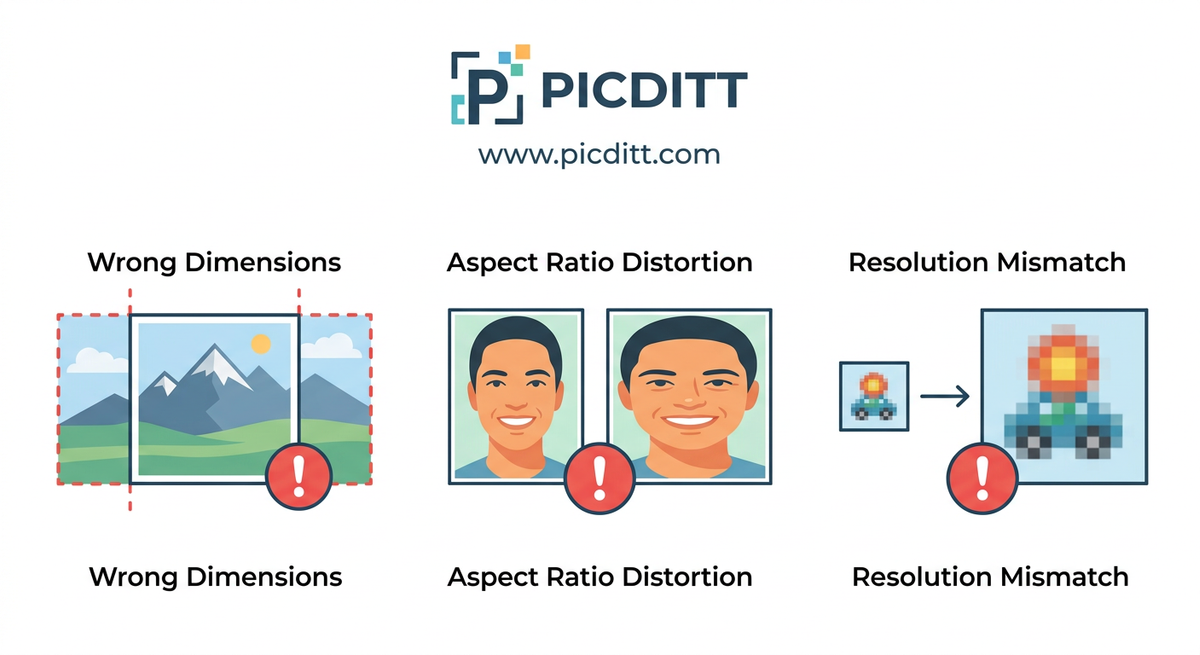
Wrong Dimensions for the Platform
Every social media platform has specific image dimension requirements. When you upload a photo that doesn't match those requirements, the platform automatically scales or crops it — and that automatic adjustment is rarely what you'd choose yourself.
A landscape photo uploaded as a WhatsApp profile picture gets cropped into a small square from the center of the image. A vertical portrait uploaded to LinkedIn might get scaled down to fit a square frame, compressing everything and making text or fine details unreadable. A perfectly good photo can look terrible simply because it was never sized correctly before uploading.
Aspect Ratio Distortion
Aspect ratio is the proportional relationship between a photo's width and height. When you resize a photo without locking its aspect ratio, the width and height change independently — and the result is a stretched or squashed image where faces look unnaturally wide or thin, circles look like ovals, and text looks warped.
This is one of the most common mistakes people make when resizing photos manually in basic editing apps. They drag one corner of the image without constraining proportions, and the distortion is subtle enough that they don't notice until the photo is already uploaded and looking wrong.
Resolution and Quality Mismatch
Resolution refers to how much detail an image contains. A low-resolution photo that's small in file size and pixel dimensions will look sharp when displayed small but will appear blurry and pixelated when scaled up to fill a larger display — or even a medium-sized profile picture frame on a high-resolution smartphone screen.
Conversely, uploading an extremely high-resolution photo doesn't always help. Platforms compress and resize images on their end, and if your source file is far larger than the platform needs, you're just giving the platform's compression algorithm more to work with — which doesn't always produce the result you want.
The Correct Image Dimensions for Every Major Platform
Here are the exact dimensions you need for perfect profile pictures and images on every major platform in 2025.
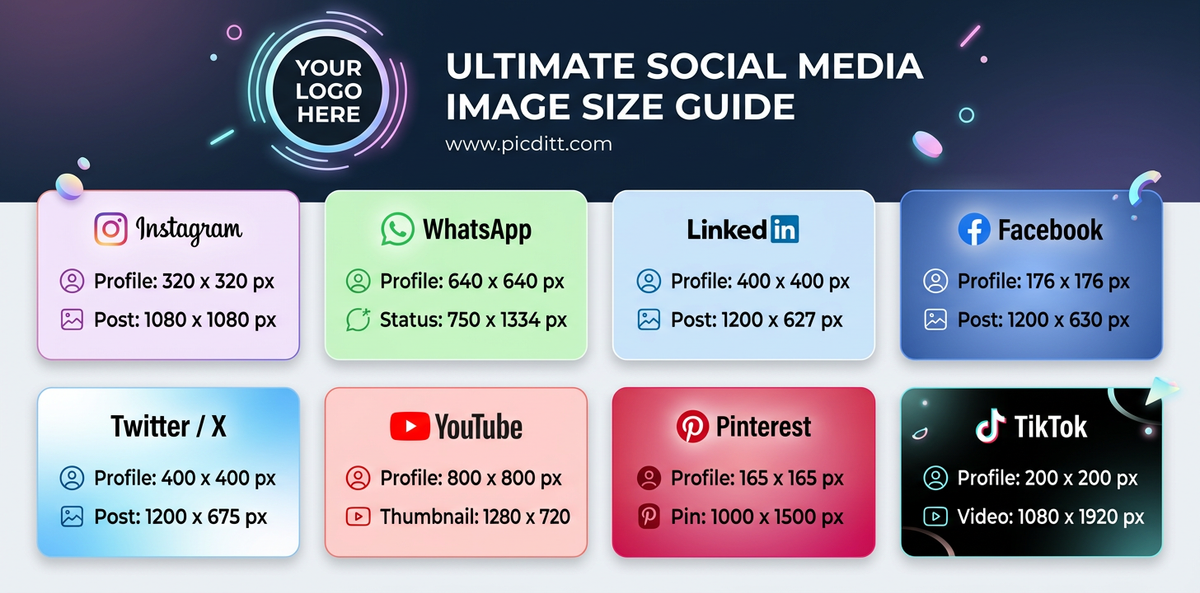
Profile Picture Dimensions
Platform
Profile Picture Size
Display Shape
Notes
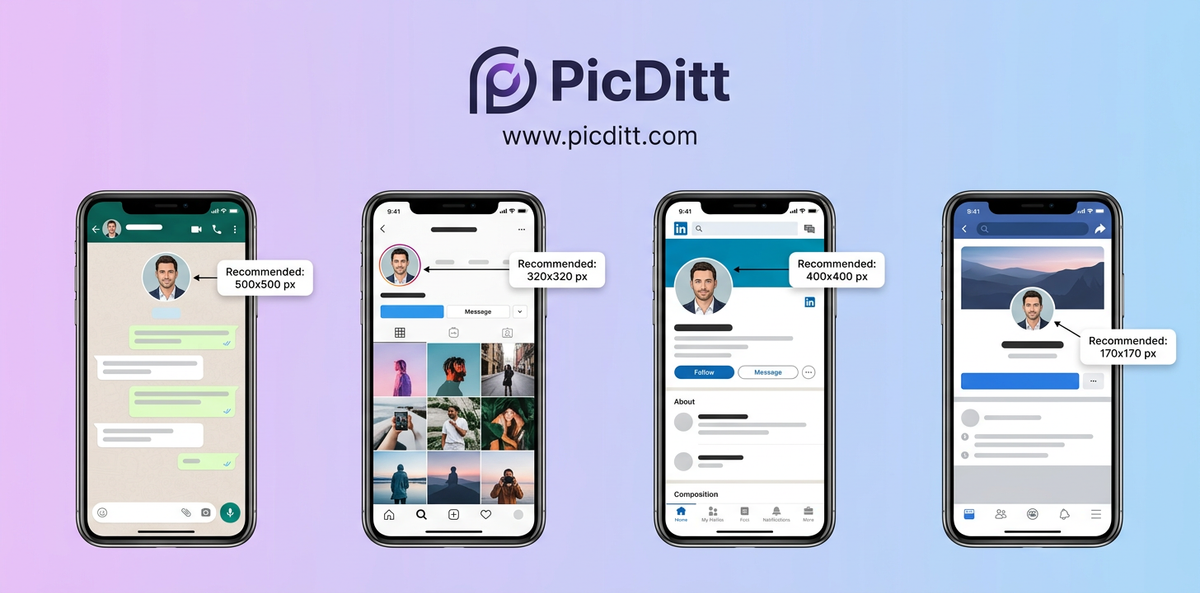
500 × 500 px (min)
Circular
Stored as square, displayed as circle
320 × 320 px (min)
Circular
Higher res recommended — 1080 × 1080 px
400 × 400 px (min)
Circular
Up to 8 MB, recommended 400–20,000 px
170 × 170 px (desktop)
Circular
128 × 128 px on mobile
Twitter/X
400 × 400 px
Circular
JPG, PNG, or GIF
YouTube
800 × 800 px
Circular
Minimum 98 × 98 px
TikTok
200 × 200 px (min)
Circular
Higher res always better
Snapchat
320 × 320 px
Circular
Square source image
Post and Content Image Dimensions
Platform
Content Type
Optimal Size
Feed Square
1080 × 1080 px
Feed Portrait
1080 × 1350 px
Feed Landscape
1080 × 566 px
Stories / Reels
1080 × 1920 px
Feed Post
1200 × 627 px
Cover Photo
1584 × 396 px
Feed Post
1200 × 630 px
Cover Photo
851 × 315 px
Twitter/X
In-Feed Image
1200 × 675 px
YouTube
Thumbnail
1280 × 720 px
Pin Image
1000 × 1500 px
The Picditt Zoom & Resize tool includes 40+ presets covering all of these dimensions — so you never have to remember these numbers. Just select the platform and the tool sets everything automatically.
Introducing the Picditt Zoom & Resize Tool
The Picditt Zoom & Resize tool is a free, browser-based image resizing tool that handles everything from quick profile picture fixes to precise professional resizing for print and web. Here's what makes it worth using.
Three Powerful Resizing Methods
By Percentage
Scale your image proportionally using a percentage value. Enter 50% to halve the dimensions, 200% to double them, or any value from 1% to 500%. This method is perfect when you need quick proportional scaling without worrying about specific pixel values. Great for reducing a large photo to a more manageable size while keeping everything in proportion.
By Exact Pixels
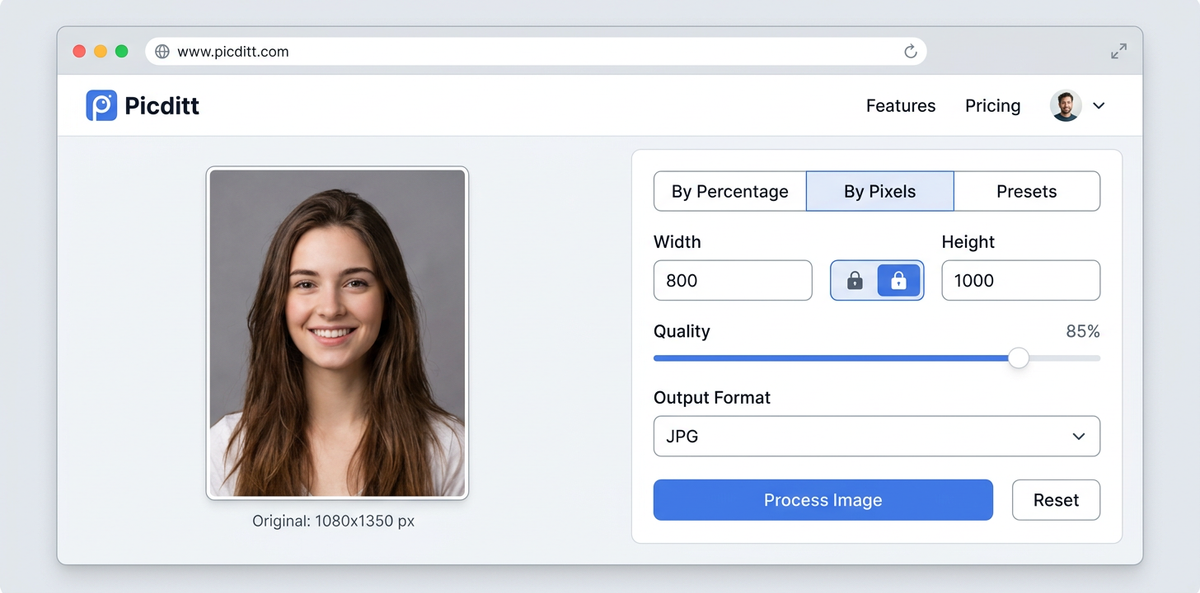
Set precise width and height values in pixels. With aspect ratio lock enabled, setting one dimension automatically calculates the other — so you can type in the width you need and the height adjusts perfectly. This method is essential when you need to hit specific platform requirements like LinkedIn's 400 × 400 px or YouTube's 1280 × 720 px thumbnail size.
By Presets
Select from 40+ preset sizes organized into four categories — Social Media, Web, Print, and Icons. Click the preset for your target platform and the tool instantly sets the correct dimensions. Zero guesswork, zero research, perfect dimensions every time.
Key Features
Aspect Ratio Lock
Toggle aspect ratio locking on or off. When locked, your image always resizes proportionally — no stretching or squashing. When unlocked, you can set any width and height independently for special design requirements.
Quality Control
Adjust compression settings (1–100%) for JPG and WebP outputs. The sweet spot for most uses is 80–90% — sharp enough to look great, compressed enough to upload and load quickly.
Image Adjustments
Fine-tune brightness, contrast, and saturation before downloading. Minor corrections can make a significant difference in how a profile picture looks, especially when it'll be displayed at small sizes.
100% Private Processing
Everything runs in your browser. Your images never leave your device — no server uploads, no data collection, no privacy risk.
No Watermarks, No Account, No Cost
Completely free. Unlimited use. No sign-up required.
Technical Specifications
Specification
Details
Input Formats
JPG, JPEG, PNG, WebP, GIF, BMP, SVG
Output Formats
JPG, PNG, WebP
Maximum Input File Size
50 MB
Maximum Output Dimensions
8192 × 8192 px
Resize Range (Percentage)
1% to 500%
Quality Settings
1% to 100% (JPG/WebP)
Preset Categories
Social Media, Web, Print, Icons (40+ total)
Aspect Ratio Options
Locked (proportional) or Unlocked (free)
Image Adjustments
Brightness, Contrast, Saturation
Processing Location
100% browser-based (client-side)
Step-by-Step Guide: How to Resize Your Profile Picture
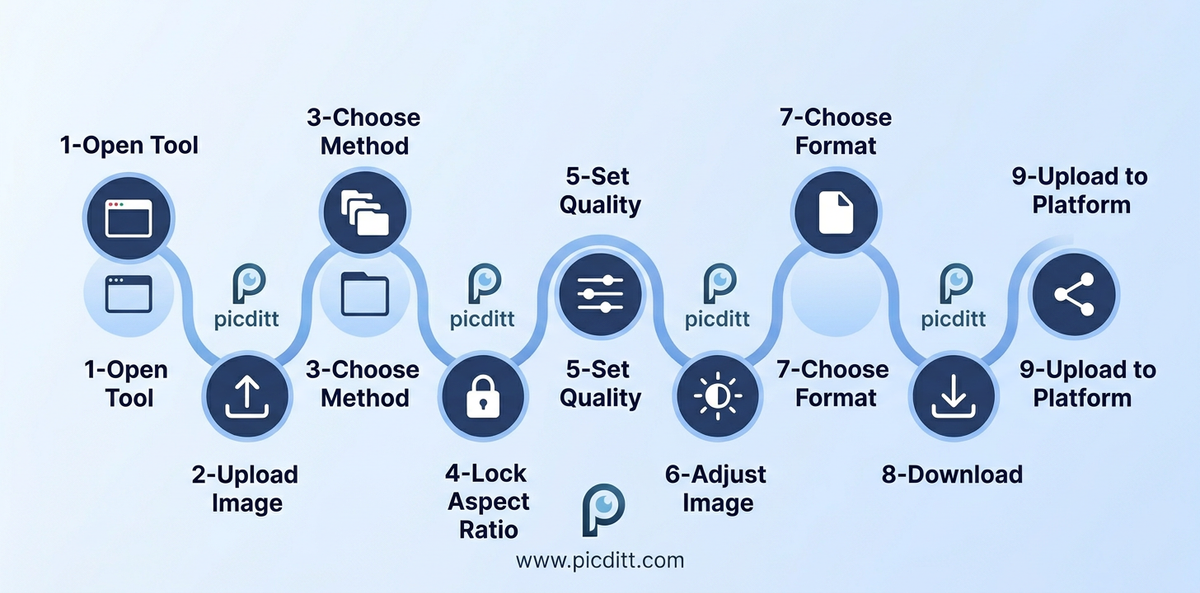
Here is the complete process for resizing any photo for any platform using the free tool.
Step 1: Open the Tool
Visit https://picditt.com/social/zoom-image in any browser on any device. No installation, no account, no loading screens.
Step 2: Upload Your Image
Click "Select Image" or drag and drop your photo directly onto the upload area. The tool accepts:
- JPG and JPEG
- PNG
- WebP
- GIF
- BMP
- SVG
Files up to 50 MB are supported. Always upload the highest resolution version of your photo available — it's always better to scale down than up.
Step 3: Choose Your Resizing Method
For profile pictures — use Presets:
Click the "Presets" tab and browse the Social Media category. Select your target platform (Instagram Profile, WhatsApp DP, LinkedIn Profile, etc.) and the tool sets the correct dimensions instantly.
For specific pixel dimensions — use By Pixels:
Click the "By Pixels" tab and enter your target width or height. Make sure the aspect ratio lock is enabled (the padlock icon should show locked) so the other dimension adjusts proportionally.
For proportional scaling — use By Percentage:
Click the "By Percentage" tab and enter a percentage. Type 50 to halve the dimensions, 75 to reduce to three-quarters, 200 to double.
Step 4: Lock Your Aspect Ratio
Unless you have a specific reason to change the proportions of your image, always keep the aspect ratio lock enabled. This is the single most important setting for avoiding stretched or squashed results. The lock icon in the tool shows you the current state — make sure it shows as locked before proceeding.
Step 5: Adjust Image Quality
For JPG or WebP outputs, set the quality slider to between 80 and 90%. This range gives you sharp, clean images with meaningfully reduced file sizes — perfect for fast-loading profile pictures. For PNG output, quality is lossless and the slider doesn't apply.
Step 6: Fine-Tune the Image (Optional)
Use the adjustment sliders to make minor corrections:
- Brightness — slightly brighten dark photos for better visibility at small sizes
- Contrast — increase contrast so facial features remain distinct when the image is displayed small
- Saturation — a slight boost can make profile pictures look more vibrant and engaging
Step 7: Choose Your Output Format
- JPG — Best for photographs and headshots. Smaller file size. Perfect for all profile pictures.
- PNG — Best for images with text, logos, or transparency. Larger files but lossless quality.
- WebP — Best for web use. Superior compression to JPG at equivalent quality. Supported by all modern browsers.
For profile pictures on WhatsApp, Instagram, LinkedIn, and Facebook, JPG is almost always the right choice.
Step 8: Download Your Resized Image
Click Download. Your resized image saves directly to your device instantly. No waiting, no email, no account required.
Step 9: Upload to Your Platform
WhatsApp:
Go to Settings → tap your profile photo → Update Photo → choose your downloaded image → confirm the circular crop (since your image is now correctly sized, the crop will be perfect).
Instagram:
Go to your profile → tap Edit Profile → tap your profile picture → choose New Profile Photo → select your downloaded image.
LinkedIn:
Click your profile picture → click the camera icon → Upload photo → select your downloaded image → adjust the circular crop frame if needed → Apply.
Platform-Specific Profile Picture Guide
How to Fix Your WhatsApp Profile Picture
WhatsApp displays profile pictures in a circular frame but stores them as squares internally. The key challenge with WhatsApp is that the circle crop cuts off the corners of your square image, so anything important in the corners of your photo will be invisible.
Best practices for WhatsApp DP:
- Resize to at least 500 × 500 px (the tool's WhatsApp preset handles this automatically)
- Center your face or main subject precisely — it should be in the middle of the square
- Leave some space around the subject since the circular crop removes corners
- Use a simple, uncluttered background — the image is displayed at small sizes in chat lists
- Export as JPG at 85–90% quality for the best balance of sharpness and file size
Common mistake: Uploading a landscape photo directly. WhatsApp crops a square from the center — if the subject is off-center, they'll be cropped out entirely. Always resize to a square first using the tool.
How to Fix Your Instagram Profile Picture
Instagram profile pictures are small — they appear at just 110 × 110 pixels on the main profile page and even smaller in comments and search results. However, Instagram stores a higher resolution version, so uploading at 1080 × 1080 px gives the platform the best source to work with when displaying at various sizes.
Best practices for Instagram profile picture:
- Upload the highest resolution square image you can (1080 × 1080 px recommended)
- Use the tool's Instagram Profile preset or set custom dimensions to 1080 × 1080
- Keep the main subject centered and filling at least 60% of the frame
- Avoid fine text or small details — they won't be readable at display size
- High contrast and bold, clear subjects work best at small sizes
Common mistake: Uploading a high-resolution portrait without resizing it first. Instagram's automatic processing of non-square images can be unpredictable. Always provide a pre-formatted square.
How to Fix Your LinkedIn Profile Picture
LinkedIn profile pictures carry more professional weight than any other platform. They appear prominently on your profile, in connection requests, in search results, and in messages. A blurry, poorly sized, or unprofessional LinkedIn photo creates a lasting negative impression.
Best practices for LinkedIn profile picture:
- Minimum size is 400 × 400 px, but 800 × 800 px or higher is strongly recommended
- LinkedIn displays at higher resolution on desktop — quality matters more here than on other platforms
- Use a clean, professional background — solid colors or simple blurred backgrounds work best
- Your face should fill approximately 60–70% of the frame — closer than you might think is right
- Export as JPG or PNG at maximum quality — LinkedIn is a professional context where image quality is worth the slightly larger file size
Common mistake: Using the same small photo across all platforms. LinkedIn deserves a dedicated, high-quality headshot resized specifically for the platform.
How to Fix Your Facebook Profile Picture
Facebook profile pictures appear in multiple contexts: your main profile (170 × 170 px on desktop), mobile (128 × 128 px), and as thumbnails next to comments and posts (as small as 32 × 32 px). This wide range means your photo needs to look good at dramatically different sizes.
Best practices for Facebook profile picture:
- Use a minimum of 400 × 400 px source image, ideally larger
- Bold, high-contrast images with clear subjects scale better across the size range
- Avoid busy backgrounds that become indistinguishable at small thumbnail sizes
- Center your subject tightly — the circular crop at small sizes can be aggressive
Understanding Upscaling vs. Downscaling
One of the most important concepts in image resizing is the difference between making an image larger (upscaling) and making it smaller (downscaling) — and why these two operations produce very different results.
Downscaling: Almost Always Safe
When you reduce an image's dimensions, you're removing pixels. The resizing algorithm intelligently combines and averages neighboring pixels to create the smaller image, and the result generally looks clean and sharp. The original detail is all still there in the source — the algorithm just has to figure out how to represent it in fewer pixels.
This is why the golden rule of image resizing is: always start with the largest image available. Downscaling from a large, high-resolution source produces excellent results at any target size.
Upscaling: Use With Caution
When you increase an image's dimensions, the algorithm has to create new pixels that didn't exist in the original. It does this by estimating what color each new pixel should be based on the colors of surrounding pixels — a process called interpolation.
The problem is that this estimation is never perfect. Fine details, sharp edges, and text become blurry as the algorithm fills in gaps with averaged, approximated colors. The more aggressively you upscale, the more pronounced this blurring becomes.
Practical guideline: Upscaling by up to 150% (1.5× the original size) usually produces acceptable results for casual use. Upscaling beyond 200% (doubling the size) typically produces noticeably soft or pixelated results depending on the content of the image and the algorithm used.
If you need to upscale significantly, start with the highest resolution source image available before using any resizing tool.
The Resize Range in the Tool
The Picditt Zoom & Resize tool supports resizing from 1% to 500% by percentage. The tool's real-time preview shows you exactly what the output will look like before you download — which is especially useful when upscaling, so you can see if quality degradation is acceptable for your use case before committing to the download.
Choosing the Right Output Format
The format you choose when downloading your resized image affects both quality and file size. Here's a practical breakdown.
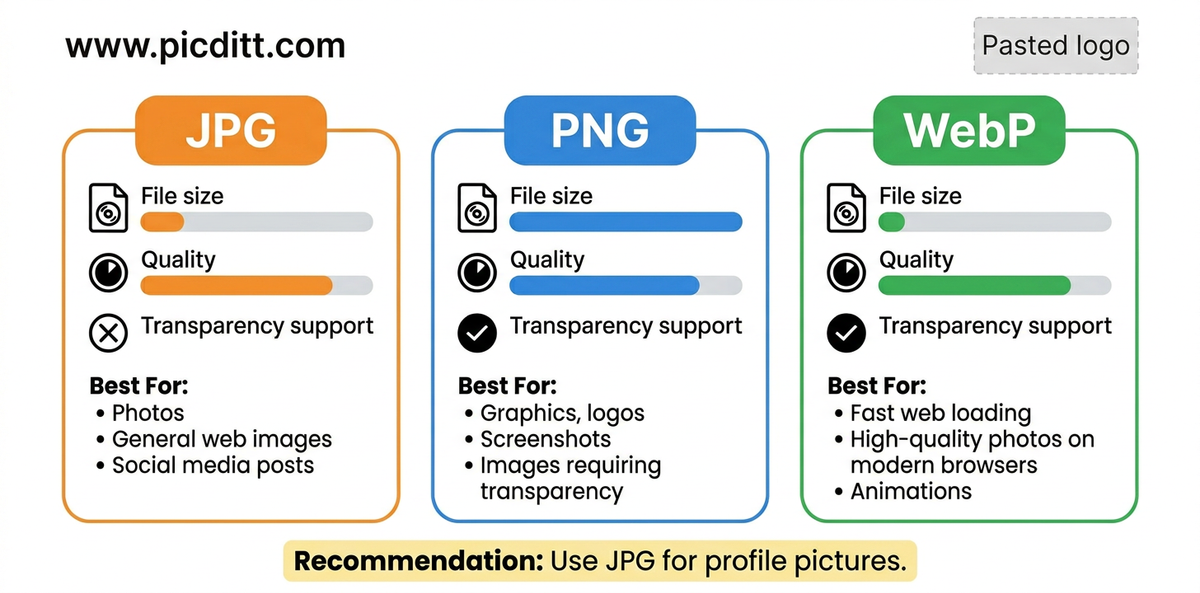
JPG (JPEG)
Best for: Photographs, headshots, profile pictures, colorful images
Compression: Lossy — discards some image data to reduce file size
Transparency: Not supported
File size: Smallest of the three options
When to use: Almost all profile pictures on social media platforms. When file size matters and you don't need transparency.
PNG
Best for: Logos, graphics, screenshots, images with text, anything needing transparency
Compression: Lossless — preserves all image data
Transparency: Supported (including semi-transparency)
File size: Larger than JPG
When to use: When image quality must be perfect and file size is less critical. When your image has a transparent background.
WebP
Best for: Web images, website optimization, modern browsers
Compression: Both lossy and lossless options
Transparency: Supported
File size: 25–35% smaller than JPG at equivalent quality
When to use: When uploading to websites or platforms that support WebP. Best balance of quality and file size for web use.
For profile pictures specifically: JPG at 85–90% quality is the right choice for virtually every platform and use case. It produces sharp, clean results at a file size that uploads and loads quickly.
Pro Tips for Perfect Profile Pictures
Tip 1: Always Start With the Highest Resolution Available
The quality of your resized output is limited by the quality of your input. If you start with a blurry, low-resolution photo, resizing won't fix the blur — it will just give you a larger blurry photo. Before resizing, make sure you're working with the best available version of your image. Use the original from your camera rather than a screenshot or a previously compressed version.
Tip 2: Increase Contrast Slightly for Small Display Sizes
Profile pictures are often displayed at very small sizes — as tiny as 32 pixels wide in some contexts. At that size, subtle features become indistinguishable. A slight contrast boost (try +10 to +15 in the tool's contrast slider) helps facial features remain clearly defined even at thumbnail sizes.
Tip 3: Test Your Profile Picture Before Finalizing
After uploading a new profile picture, check how it looks:
- In the full-size view when someone taps or clicks on it
- As a small thumbnail beside a comment or message
- On both mobile and desktop if possible
- In both light mode and dark mode interfaces
These different contexts can reveal cropping or visibility issues that aren't obvious from the profile page alone.
Tip 4: Use the Platform Preset, Then Fine-Tune
The fastest workflow is to select the relevant platform preset (which sets the correct dimensions automatically), then use the zoom and brightness controls to fine-tune how the image fills the frame. This combines the convenience of presets with the control of manual adjustment.
Tip 5: Maintain a Consistent Look Across Platforms
Ideally, your profile picture should be recognizable across all the platforms where you're active. Use the same photo resized appropriately for each platform rather than completely different photos. This creates a consistent personal or brand identity that makes you instantly recognizable wherever someone encounters you online.
Frequently Asked Questions
Why does my profile picture look blurry after uploading?
Blurriness after uploading usually has two causes. First, your source image may be lower resolution than the platform requires — always upload the highest resolution version available. Second, social media platforms compress images when you upload them. To minimize compression blur, upload images at the platform's recommended dimensions (not larger) and use JPG at 85–90% quality. Oversized images force the platform's compression algorithm to work harder, sometimes producing worse results than a properly sized source image.
How do I resize a photo without stretching it?
Always keep the aspect ratio locked when resizing. In the Picditt tool, the aspect ratio lock toggle appears between the width and height input fields. When locked, changing one dimension automatically adjusts the other to maintain the original proportions. This prevents stretching or squashing regardless of how dramatically you resize the image.
What is the best size for a WhatsApp profile picture?
WhatsApp recommends a minimum of 500 × 500 pixels for profile pictures, though uploading at a higher resolution (800 × 800 or 1080 × 1080) gives the app more detail to work with when displaying at various sizes. The image is stored as a square but displayed in a circular frame, so center your subject carefully. Use the WhatsApp preset in the Picditt tool for automatically correct dimensions.
Can I make a small image larger without losing quality?
To a limited degree, yes. The Picditt tool supports upscaling from 1% to 500%, but upscaling always involves some quality trade-off because the algorithm must create pixels that didn't exist in the original image. Upscaling by up to 150% of the original size typically produces acceptable results. Beyond 200%, blurring and pixelation become increasingly noticeable. For the best results, always start with the highest resolution source image available rather than upscaling from a small version.
Is it safe to upload my photos to this tool?
Yes — and importantly, you're not actually uploading your photos anywhere. The Picditt Zoom & Resize tool processes everything entirely within your browser using client-side JavaScript and HTML5 Canvas APIs. Your images are loaded into your browser's local memory and never transmitted to any external server. This is verifiable by checking your browser's network inspector while using the tool — you'll see no image data leaving your device.
What's the difference between resizing and cropping?
Resizing changes the dimensions of the entire image — everything in the photo scales proportionally (or non-proportionally if aspect ratio lock is off). Cropping removes portions of the image and keeps only the selected area at its original resolution. For profile pictures, you often need both — crop to center your subject, then resize to the platform's required dimensions. The Picditt tool handles resizing; for cropping, use a complementary photo editing tool before resizing.
Why does my LinkedIn profile picture look different on mobile and desktop?
LinkedIn displays profile pictures at different sizes depending on the context and device — 400 × 400 px on desktop profile pages, smaller in search results and messages, and different sizes again on mobile. This is why uploading a high-resolution image (800 × 800 px or larger) is important for LinkedIn specifically — a higher resolution source image looks better across all these different display sizes because the platform has more detail to work with when scaling down.
Can I use this tool on my phone?
Yes. The Picditt Zoom & Resize tool is fully mobile-responsive and works in any mobile browser on iOS or Android. You can upload photos directly from your camera roll, adjust settings using touch controls, and download the resized image directly to your photo library — all without needing to install any app.
How do I resize an image to an exact pixel size?
Click the "By Pixels" tab in the tool, ensure aspect ratio lock is enabled, and type your target width into the width field. The height will automatically calculate to maintain the correct proportions. If you need both a specific width and height that differ from your image's natural proportions, unlock the aspect ratio and enter both dimensions — but be aware this will distort the image.
Does resizing affect the file size?
Yes, significantly. Smaller pixel dimensions generally produce smaller file sizes because there is less image data to store. However, file size is also affected by the output format (JPG vs. PNG vs. WebP) and the quality setting for compressed formats. A 1080 × 1080 JPG at 90% quality will be much smaller than the same dimensions at 100% quality, and much larger than the same image saved as WebP at 80% quality.
Final Thoughts: Your Profile Picture Deserves to Look Right
Your profile picture follows you everywhere online. It appears in search results, comment sections, message threads, professional directories, and everywhere someone looks you up or sees your name. It takes less than a second to form an impression — and a blurry, stretched, or awkwardly cropped profile photo forms the wrong one instantly.
The fix takes under a minute. The right dimensions, the right format, the right quality settings — these are not complicated decisions once you know what each platform needs and have the right tool to apply it.
The free Picditt Zoom & Resize tool handles all of it. Three resizing methods, 40+ platform presets, aspect ratio lock, quality control, image adjustments, and complete privacy — all in your browser, all at no cost, with no watermarks and no account required.
Whether you're refreshing your LinkedIn headshot before a job search, updating your WhatsApp DP, or standardizing your profile picture across every platform where your brand appears — start with the right dimensions and the right tool.
Your profile picture is your first impression. Make it the right one.
Try the Picditt Zoom & Resize Tool Free →
Ready to Try It Yourself?
Use this tool for free — no signup, no download, no watermarks.
Open Free ToolYou Might Also Like

YouTube Banner Maker with Safe Zone Guides: Design Channel Art That Looks Perfect on Every Device
Your YouTube banner looks different on every device. Learn how to design a 2560×1440 channel banner that works perfectly on TV, desktop, tablet, and mobile using PicDitt's free YouTube Banner Maker with built-in safe zone guides.
Read More →
Remove Image Background Instantly with AI — Free Online Tool
Remove backgrounds from any photo instantly using advanced AI — completely free. Keep transparent, add solid colors, gradients, or custom backgrounds. All processing happens in your browser for complete privacy. No signup, no watermarks.
Read More →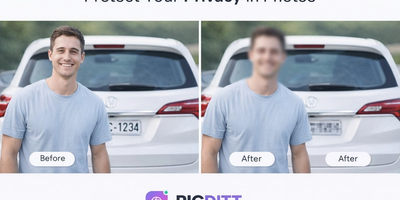
Protect Your Privacy: How to Blur Faces and Sensitive Info in Photos (Free Online)
Protect your privacy by blurring faces, text, and sensitive data in images. Learn how to use a free online tool to pixelate or blur photos instantly.
Read More →