The Ultimate Guide to Posting Full-Size Photos on Instagram & WhatsApp (No Crop Needed)

Advertisement
The Ultimate Guide to Posting Full-Size Photos on Instagram & WhatsApp (No Crop Needed)
You've spent time composing the perfect shot. The lighting is right, the framing is thoughtful, and every person in the frame is smiling. Then Instagram demands you crop it into a square — and just like that, half the photo disappears.
Sound familiar?
Whether it's a sweeping landscape that loses its horizon, a group photo where someone gets cut from the edge, or a product shot where the packaging details vanish, Instagram's crop problem frustrates photographers, creators, brands, and casual users alike every single day.
The good news? You don't have to choose between your photo and the platform anymore.
In this complete guide, you'll learn exactly why cropping happens, what a no-crop solution looks like, how to use the free Picditt Instagram No Crop tool to post full-size photos on Instagram and WhatsApp without losing a single pixel — and the professional techniques that make your photos look even better with a perfectly blurred or custom-colored background.
Let's fix your feed.

Why Instagram and WhatsApp Crop Your Photos
Before we dive into solutions, it helps to understand exactly why these platforms crop your images in the first place.
Instagram's Square Legacy
Instagram launched in 2010 with a single supported format: the square (1:1 ratio). This was a deliberate design choice inspired by Polaroid photos and the aesthetics of analog photography. Even after Instagram expanded to support landscape (1.91:1) and portrait (4:5) formats in 2015, the profile grid still displays every post as a square thumbnail.
This means even if you post a landscape or portrait photo at a non-square ratio, anyone scrolling your profile grid sees a cropped square version of it. If the subject of your photo is off-center, the grid thumbnail might show nothing but background.
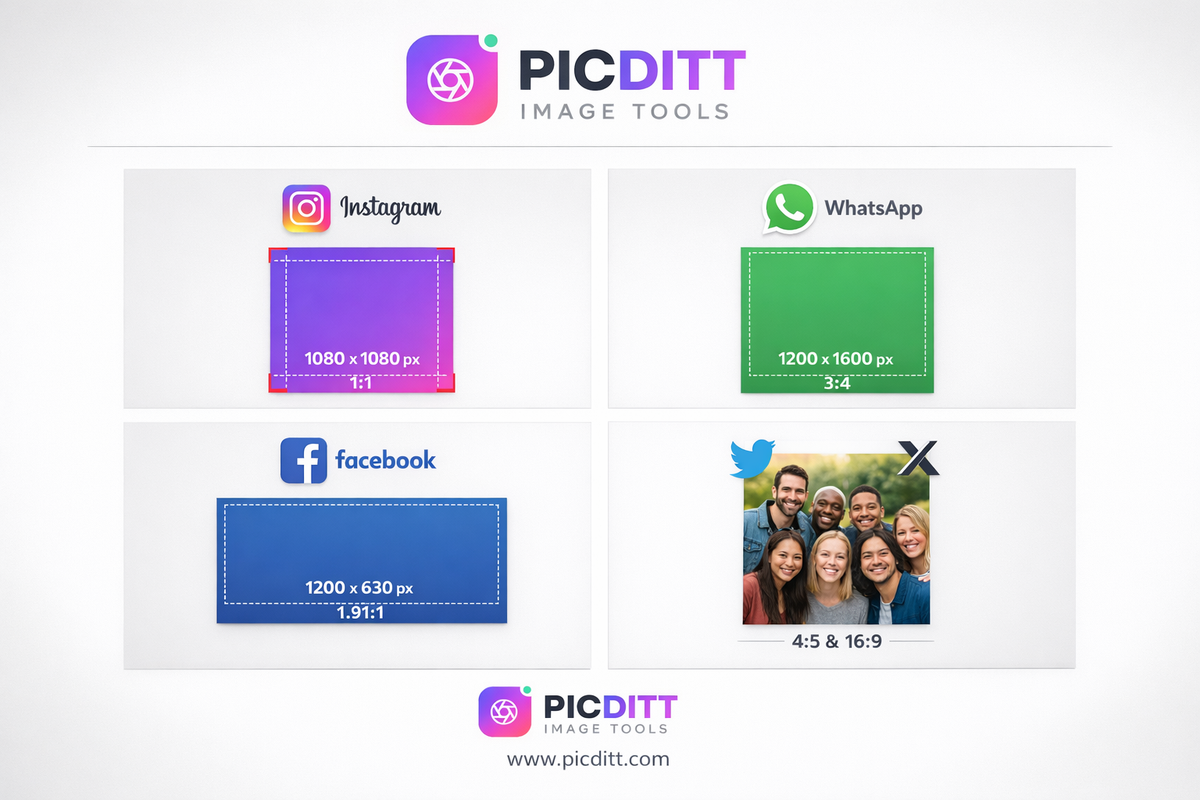
For feed posts, Instagram currently supports:
Format
Aspect Ratio
Best Dimensions
Square
1:1
1080 × 1080 px
Landscape
1.91:1
1080 × 566 px
Portrait
4:5
1080 × 1350 px
But for a consistent, beautiful profile grid — the thing people actually see when they visit your account — square posts still reign supreme.
WhatsApp Profile Picture (DP) Cropping
WhatsApp displays all profile pictures in a circular crop, but stores them internally as squares. This means:
- Portrait photos get cropped on the top and bottom
- Landscape photos get cropped on the sides
- Any photo with a subject near the edges risks losing important parts of the image
If your display picture keeps cutting off your face or removing the background you carefully chose, this is why.
Facebook and Twitter/X
Both platforms have their own quirks. Facebook crops cover photos, profile pictures, and post images differently depending on how they're viewed (mobile vs. desktop). Twitter/X shows images in a cropped preview in-feed but allows users to expand them. In both cases, having a perfectly squared photo with intentional borders beats relying on the platform's automatic cropping algorithm.
What Is "No Crop" Photo Editing?
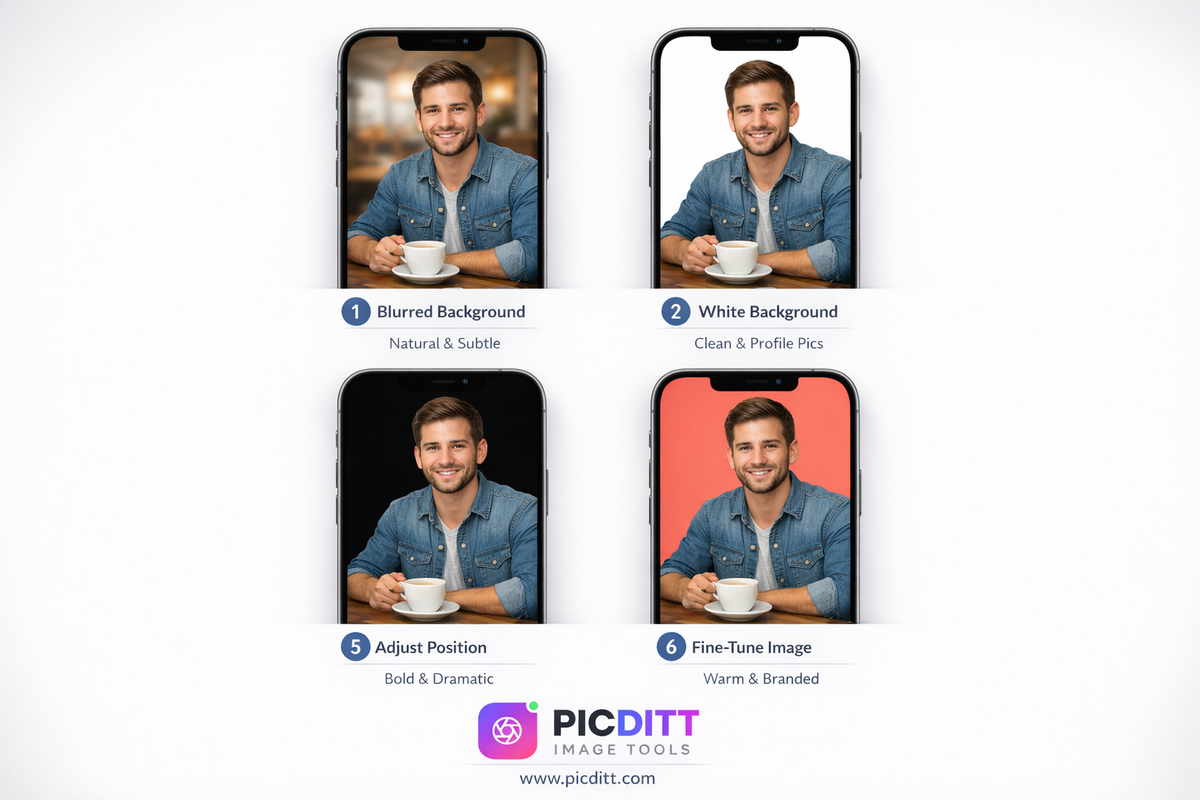
No-crop photo editing is a technique where your original photo is fitted into a square (or other required) canvas without removing any part of the image. Instead of cutting the photo, the tool adds a background around it to fill the empty space.
This background can be:
- A blurred version of your own photo — the most popular and professional-looking option
- A solid color — great for minimalist or branded feeds
- A gradient — ideal for artistic or eye-catching posts
- A custom color — perfect for matching specific brand palettes
The result is a photo that fits any platform's requirements perfectly while preserving 100% of your original image.
The Blurred Background Effect Explained
The blurred background technique — sometimes called the "frosted glass effect" or "bokeh border" — works like this:
- Your original image is scaled up to fill the entire square canvas
- A Gaussian blur is applied to this scaled version, creating a soft, dreamy background
- Your original, unblurred photo is then centered on top of the blurred background
- The result is a seamless, professional-looking square image
The magic of this approach is that the background is derived directly from your photo's own colors. A sunset photo gets warm orange and pink tones in the background. A forest shot gets rich greens and earth tones. A portrait gets complementary skin tones and background hues. Nothing looks out of place because everything comes from the same source image.
This technique is used by professional photographers, major brands, and top influencers worldwide — and now it's available to anyone for free.
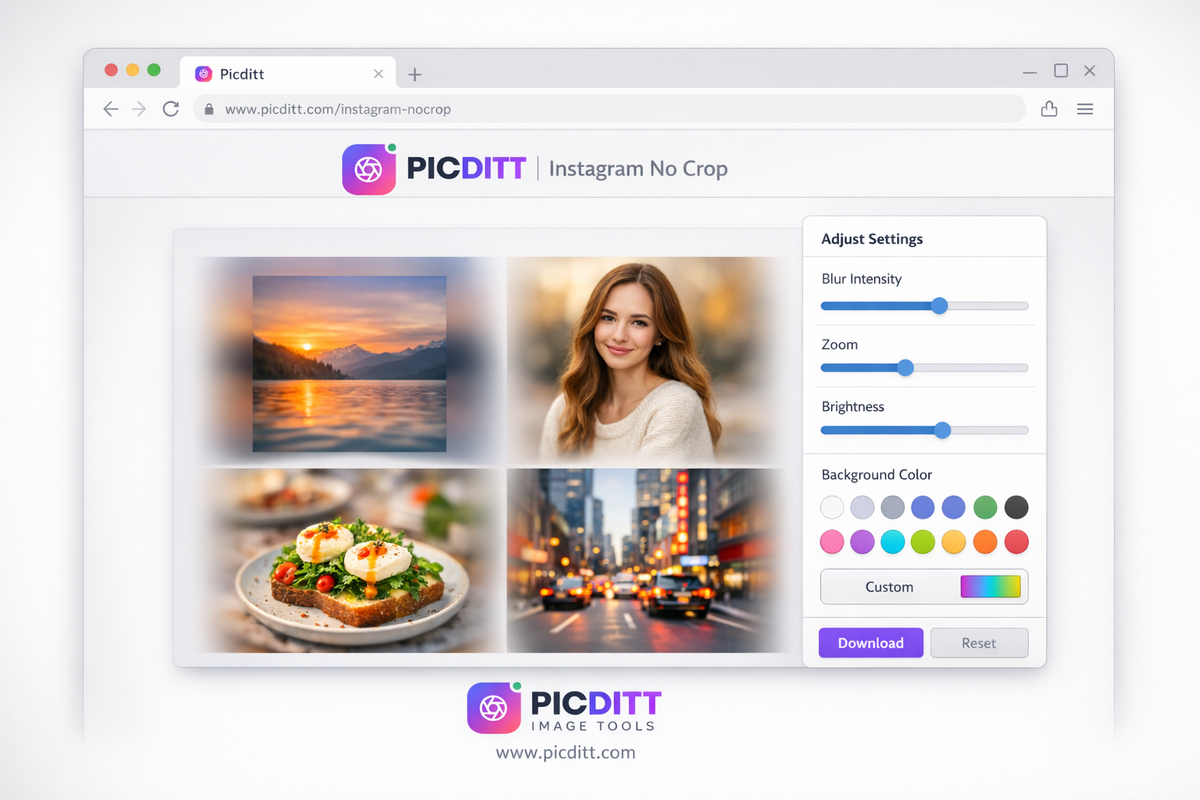
Introducing the Picditt Instagram No Crop Tool
The Picditt Instagram No Crop tool is a free, browser-based photo editor that lets you post full-size photos on Instagram, WhatsApp, Facebook, and Twitter/X without cropping anything.
Here's what makes it stand out:
Key Features
Blurred Background Generation
Automatically creates a beautiful blurred background from your own photo. Zero effort, professional results, always color-matched.
50+ Colors and Gradients
Choose from solid colors, pre-designed gradients (Sunset, Ocean, Forest, and more), or enter a custom hex color to match your brand perfectly.
Drag to Reposition
After uploading, simply drag your photo to position it exactly where you want it within the square canvas. Center it, shift it left, move it up — total control.
Zoom Control
Use the zoom slider (10% to 300%) to make your subject larger or show more of your scene. This is especially useful for portrait photos where you want the face to be more prominent.
Image Adjustments
Fine-tune brightness, contrast, and saturation before downloading. No need to open a separate photo editor.
Multiple Platform Presets
One-click presets for Instagram (1080×1080), WhatsApp DP (500×500), Facebook (1200×1200), and Twitter/X (1200×675).
Rotation
Rotate your image in 90° increments or any custom angle. Fix sideways photos before posting.
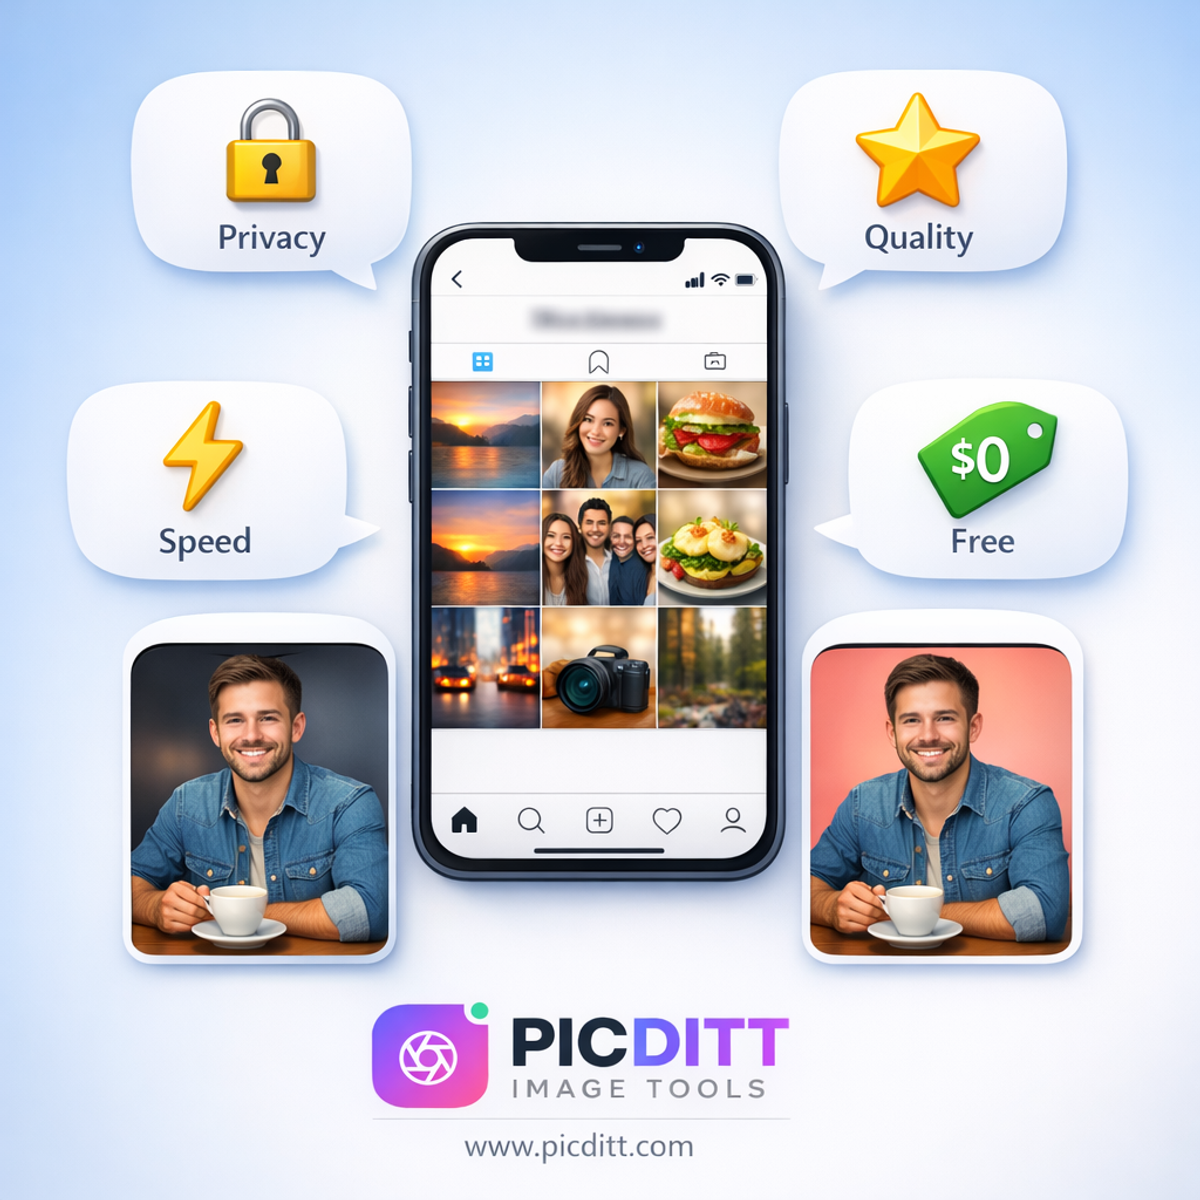
100% Private Processing
All processing happens entirely in your browser using JavaScript and HTML5 Canvas. Your photos never leave your device. No uploads to servers. No data collection.
No Watermarks, No Sign-Up, No Cost
Completely free. No account required. No subscription. No watermark on your photos.
Technical Specifications
Specification
Details
Supported Input Formats
JPG, JPEG, PNG, GIF, WebP, BMP
Output Formats
JPG (optimized) or PNG (high quality)
Maximum Input File Size
50 MB per image
Maximum Resolution
8192 × 8192 pixels
Output Quality
Up to 4K resolution (4096px)
Blur Intensity Range
0 – 100 (fully customizable)
Zoom Range
10% – 300%
Rotation
90° increments, full 360°
Color Picker
Full RGB spectrum + hex input
Processing Location
100% browser-based (client-side)
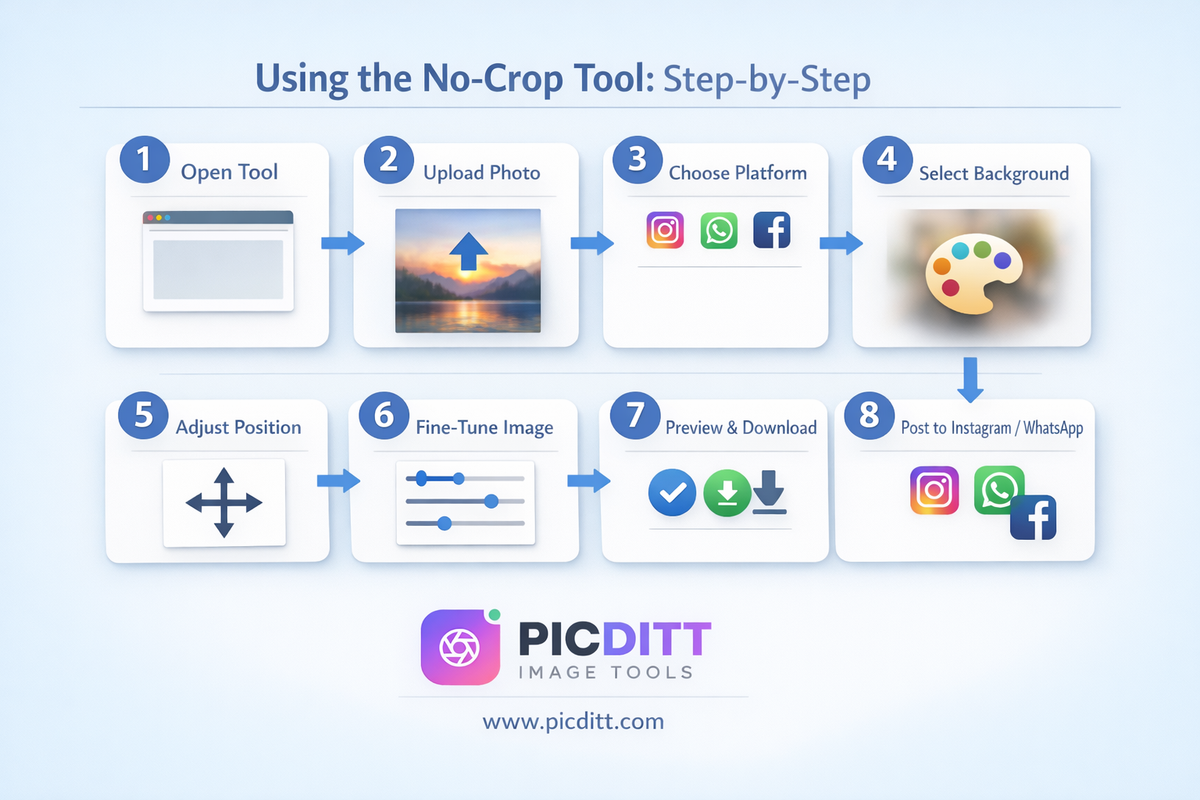
Step-by-Step Guide: How to Post Full-Size Photos on Instagram Without Cropping
Here's exactly how to use the tool from start to finish.
Step 1: Open the Tool
Visit https://picditt.com/social/instagram-no-crop on any device — desktop, tablet, or smartphone. No app download required. No account needed.
Step 2: Upload Your Photo
Click the "Select Photo" button or drag and drop your image directly onto the upload area. The tool accepts:
- JPG and JPEG
- PNG
- GIF
- WebP
- BMP
Files up to 50 MB are supported, and input resolution up to 8192 × 8192 pixels.
Pro Tip: Use the highest resolution version of your photo available. The tool preserves your original quality and outputs up to 4K resolution — give it the best image to work with.
Step 3: Choose Your Platform Preset
Select your target platform from the preset options:
- Instagram — outputs a 1080 × 1080 px square
- WhatsApp DP — outputs a 500 × 500 px square optimized for profile pictures
- Facebook — outputs a 1200 × 1200 px square
- Twitter/X — outputs at Twitter's optimal dimensions
The canvas instantly adjusts to the correct size for your chosen platform.
Step 4: Select Your Background Style
This is where the magic happens. Choose from:
Option A: Blurred Background (Recommended)
Click "Blurred Background" and use the blur intensity slider (0–100) to control how soft the background appears. For most photos, a blur intensity between 60–80 looks most professional. Try different values — a lower blur can look painterly and artistic, while higher blur creates a clean, soft effect.
Option B: Solid Color
Click "Solid Color" and choose from the preset swatches (white, black, gray, beige, and more) or enter a custom hex color code for exact brand matching.
Option C: Gradient
Browse the 50+ gradient presets or create your own by selecting two colors and a direction (horizontal, vertical, or diagonal).
Option D: Custom Color
Use the full RGB color picker to select any color in the visible spectrum. Enter a hex code directly if you have brand guidelines to follow.
Step 5: Adjust Position and Zoom
- Drag your photo within the canvas to reposition it. Center it perfectly or shift the subject toward the rule-of-thirds positions for a more dynamic composition.
- Use the zoom slider to scale your photo up or down. Zoom in to make a face or subject more prominent. Zoom out to show more of the scene.
Step 6: Fine-Tune the Image (Optional)
Use the image adjustment sliders to make minor corrections:
- Brightness — lighten or darken the photo
- Contrast — increase or decrease the difference between lights and darks
- Saturation — boost or reduce the intensity of colors
These adjustments apply to your photo only, not the background, keeping everything looking natural and cohesive.
Step 7: Preview and Download
Check the live preview carefully at full size. Look at:
- Is the subject well-positioned and clearly visible?
- Does the background complement or compete with the photo?
- Are the colors accurate and appealing?
- Is the overall composition balanced?
When you're satisfied, click "Download". Your image downloads instantly to your device in your chosen format (JPG or PNG), ready to upload directly to Instagram, WhatsApp, or any other platform.
Step 8: Post to Instagram or WhatsApp
For Instagram:
- Open Instagram and tap the + button
- Select your downloaded image from your camera roll
- Instagram will accept it as a perfect square — no crop prompt will appear
- Add your caption, hashtags, and location
- Share!
For WhatsApp DP:
- Open WhatsApp and go to Settings → Profile
- Tap your current profile photo
- Select the downloaded square image
- WhatsApp will show you a circular crop preview — since your image is already square, just confirm
- Save!
Creative Backgrounds: Which One Should You Choose?
Choosing the right background can dramatically change the mood and professionalism of your post. Here's a practical guide:
Blurred Background — Best For:
- Portrait photography — skin tones and clothing colors naturally fill the background
- Travel and landscape photos — sky colors and scenery create a seamless extension of the image
- Food photography — table surfaces and plating colors make beautiful soft backgrounds
- Any photo where you want a professional, polished look without spending time on design
White Background — Best For:
- Product photography — clean, e-commerce style that makes products pop
- Minimalist feed aesthetics — creates a gallery or editorial feel
- Text-heavy posts — the white border is subtle and doesn't compete with your content
- Businesses that use a predominantly white brand palette
Black Background — Best For:
- Night photography and astrophotography — dark backgrounds feel natural and cinematic
- High-contrast artistic photos — creates a dramatic, gallery-worthy presentation
- Musicians, artists, and creatives going for an edgy, sophisticated aesthetic
- Any photo with lots of dark tones that would blend beautifully into a black border
Custom Brand Color — Best For:
- Business accounts that need visual consistency across all posts
- Influencers with a defined color palette as part of their personal brand
- Marketing campaigns where specific brand colors must be maintained
- Product posts where background color is specified in brand guidelines
Gradient — Best For:
- Vibrant, eye-catching posts designed to stand out in a busy feed
- Lifestyle and fashion content where bold aesthetics are valued
- Promotional posts where you want extra visual energy
- Younger audiences who respond to colorful, dynamic visuals
Best Practices for Different Use Cases
For Instagram Feed Posts — Consistency Is Everything
The most successful Instagram accounts share one quality: visual consistency. If you're going to use the no-crop tool for your feed, decide on one background style and stick with it across all your posts. This creates a cohesive, professional grid that makes your profile look intentional and curated.
Practical consistency tips:
- Choose one background style (blurred, white, or brand color) and use it for all no-crop posts
- Keep the blur intensity at the same level (e.g., always at 70)
- Use the same zoom level as a starting point for all photos before fine-tuning
- Consider keeping the same brightness and contrast adjustments across posts for a unified look
For WhatsApp Display Pictures — Center Your Subject
WhatsApp profile photos are displayed in a circular crop at various sizes — small in chat lists, larger in contact info, even larger when tapped. This means:
- Center your subject (especially your face) precisely in the middle of the square
- Avoid important elements near the corners — they'll be cut off by the circular display
- Use a simple, uncluttered background — blurred backgrounds work particularly well here because they create a natural vignette that guides the eye to the center
- Test at small sizes — shrink your preview to simulate how the thumbnail will look in a chat list
For Business and Brand Posts — Match Your Identity
If you're managing a brand Instagram account, the no-crop tool becomes a powerful branding asset:
- Use your brand's exact hex color codes for custom backgrounds
- Apply consistent brightness and contrast adjustments that match your brand's visual tone
- Download in PNG format for the highest quality when posting product or design images
- Maintain the same zoom level and positioning style for product photos to create a catalog-like consistency
For Photography Portfolios — Let the Photo Speak
If you're a photographer using Instagram as a portfolio, the blurred background option is almost always the right choice. It:
- Preserves your original composition without introducing foreign design elements
- Maintains the color story of each individual photograph
- Keeps the focus entirely on your work
- Creates a professional gallery aesthetic that photography audiences appreciate
Privacy and Security: Why It Matters
In an era where every app seems to collect, store, and sometimes sell user data, the privacy implications of uploading your personal photos to online tools deserve serious attention.
Many photo editing websites work by uploading your images to their servers for processing. This means:
- Your photos are transmitted over the internet
- They're stored on someone else's server, even temporarily
- They could potentially be accessed by the service provider
- They could theoretically appear in training datasets for AI systems
- Data breaches could expose your photos
The Picditt Instagram No Crop tool takes a fundamentally different approach.
All processing happens 100% in your browser using JavaScript and HTML5 Canvas APIs. When you upload a photo, it's loaded directly into your browser's memory — it never travels anywhere. The blurring, background generation, resizing, color adjustments, and final rendering all happen on your device. The download goes directly from your browser to your device's storage.
This means:
- Your private family photos stay private
- Your confidential business images stay confidential
- Your personal selfies never appear on a stranger's server
- No account is required because no data is ever sent anywhere
This approach is also faster than server-based tools. Since there's no upload time, no processing queue, and no download time for the processed image, the entire operation completes in under one second regardless of your internet connection speed.
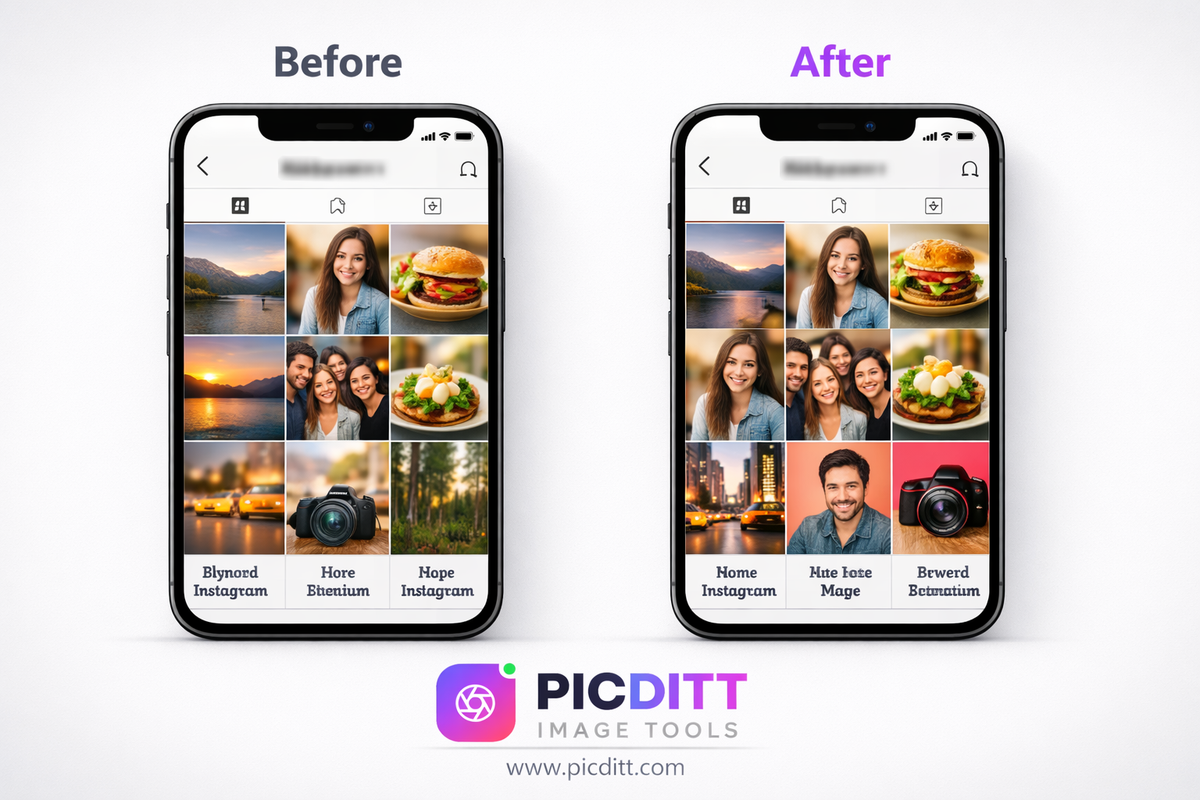
Why Your Instagram Grid Matters More Than Individual Posts
Many people focus all their attention on individual posts — the caption, the hashtags, the timing. But sophisticated Instagram users know that your profile grid is your first impression.
When someone discovers your account through a hashtag, a reel, or a mutual follow suggestion, they tap your username. In the next two seconds, they're looking at your profile grid — not reading your bio, not watching your highlights — just seeing your grid. That grid determines whether they follow you or leave.
A grid filled with photos that have been awkwardly cropped, with random orientation changes between portrait and landscape, with inconsistent color tones and visual styles, communicates carelessness. Visitors leave.
A grid with consistently formatted square posts, thoughtful background choices that complement each photo's palette, and a unified visual identity communicates professionalism, intentionality, and quality. Visitors follow.
The no-crop tool isn't just about saving your photos from being cut. It's about elevating your entire Instagram presence with a consistent, professional presentation that converts profile visitors into followers.
Common Mistakes to Avoid When Posting No-Crop Photos
Even with the right tool, a few common mistakes can undermine your results. Here's what to watch out for:
1. Using Low-Resolution Source Images
The tool outputs up to 4K resolution, but it can't invent detail that isn't in your original photo. Always start with the highest resolution version of your image available. Blurring a low-res photo just makes the blur look grainy.
2. Ignoring the Grid Context
Before downloading, think about how this post will look next to the photos already on your profile. If your last three posts all used white backgrounds, switching to a dark blurred background might look jarring. Plan your grid, don't just react to individual posts.
3. Maximizing Zoom Every Time
It's tempting to zoom in as much as possible to make subjects look large and prominent. But sometimes a slightly zoomed-out view that shows more of your original composition looks more artistic and intentional. Experiment with zoom levels rather than defaulting to maximum.
4. Forgetting to Preview at Full Size
The live preview in the tool gives you a good sense of the result, but always zoom in on your downloaded image before posting. Look at the edges, the background transitions, the color accuracy — make sure everything looks exactly how you want it.
5. Changing Background Styles Too Frequently
Consistency is the foundation of a great Instagram grid. If you use blurred backgrounds for five posts and then suddenly switch to a white border and then a gradient, your grid loses its visual coherence. Commit to a style and build on it.
6. Posting Portrait Photos Without Checking WhatsApp's Circular Crop
When preparing a WhatsApp DP from a portrait-orientation photo, the subject might be perfectly centered in your square, but check how it looks in WhatsApp's circular preview. The corners that get cut off by the circle might be more important than you realized.
Frequently Asked Questions
Does the Picditt No Crop tool really not upload my photos anywhere?
Correct. All processing happens entirely within your web browser using client-side JavaScript and HTML5 Canvas technology. Your photos are loaded directly into your browser's memory and never transmitted to any server. This is verifiable — you can open your browser's network inspector while using the tool and confirm that no image data leaves your device.
Will Instagram reduce the quality of my photo after I post it?
Instagram does compress images during upload, but this compression is applied after your image has been correctly formatted. By uploading a properly sized 1080 × 1080 pixel image (which is what the tool outputs), you give Instagram the ideal source to work with. The platform's compression will be minimal compared to what happens when you upload an oversized or incorrectly formatted image.
Can I use this tool for Instagram Reels or Stories?
The tool's primary presets target square formats for feed posts and profile pictures. Instagram Stories and Reels use a 9:16 vertical format (1080 × 1920 px). While you can use the tool by setting a custom canvas size, the no-crop approach works best for the square format. For Stories, a different aspect ratio tool or direct posting of portrait-oriented photos tends to work better.
What's the difference between JPG and PNG output? Which should I choose?
JPG produces smaller file sizes with very slight quality compression — ideal for photos, landscapes, and portraits where ultra-fine detail isn't critical. PNG produces larger files with lossless quality — ideal for images with text, sharp edges, logos, or design elements where compression artifacts would be visible. For most Instagram food, travel, and portrait posts, JPG is perfectly fine and uploads faster.
Will my WhatsApp DP look good at all sizes?
Yes, if you follow the best practices of centering your subject and using a clean background. WhatsApp displays profile pictures at multiple sizes: tiny thumbnails in the chat list, medium size in contacts, and full-size when a contact taps your photo. The square format ensures the image scales proportionally at all sizes. The circular crop removes the corners at display time — make sure nothing important is in the corners of your square.
Can I use this tool on my smartphone?
Absolutely. The tool is fully mobile-responsive and touch-optimized. You can upload directly from your camera roll, use pinch-to-zoom gestures, drag to reposition, and download directly to your photo library — all within your mobile browser without needing to install any app.
Is there a limit to how many photos I can process?
No. There are no usage limits, no daily quotas, and no premium tiers. You can process as many photos as you need, completely free, without creating an account or providing any personal information.
Why does the blurred background sometimes look different from what I expected?
The blurred background is generated from a scaled-up and blurred version of your original photo. The colors, tones, and patterns in your photo directly determine what the background looks like. For photos with very uniform colors (a plain blue sky, a white wall), the background will be very simple and monochromatic — which is often exactly right. For photos with complex color palettes, the background will show a blend of those colors. Adjusting the blur intensity slider significantly changes the appearance — try values between 40 and 90 to find your preferred look.
How is this different from just adding a white border in Instagram?
Instagram's built-in border option (available when editing a post) only adds a thin white border and doesn't fully solve the aspect ratio problem for extreme landscape or portrait photos. It also gives you no control over border size, color, or background style. The Picditt tool gives you complete control over the background treatment, lets you choose from dozens of styles, and outputs a properly formatted square image before you even open Instagram.
Can I batch process multiple photos at once?
Currently, the tool processes one photo at a time. For content creators who need to prepare many photos consistently, a workflow approach works well: open the tool, set your preferred background style and settings, process each photo one by one downloading each result. Since processing happens in under a second, even large batches move quickly.
Final Thoughts: Stop Letting Platforms Dictate Your Photos
Every great photo tells a story. Every crop takes something from that story.
You shouldn't have to choose between the platform and the photo. You shouldn't have to decide which person in the group shot gets cropped out, or whether the mountain peak or the lake in the foreground is more important, or whether your product's packaging detail is worth sacrificing for a square format.
The Picditt Instagram No Crop tool gives you back that choice. It's free, it's fast, it's completely private, and it takes under a minute to produce a result that looks genuinely professional. Whether you're posting one photo or rebuilding your entire Instagram aesthetic, the no-crop approach preserves what matters — your original image — while giving your feed the consistency and polish that makes people stop scrolling and start following.
Your photos deserve to be seen in full. Start posting them that way.
Try the Picditt Instagram No Crop Tool Free →
Looking specifically for WhatsApp DP resizing tips? See our dedicated guide: WhatsApp DP Resizer: How to Fit Your Full Photo Without Cropping
Ready to Try It Yourself?
Use this tool for free — no signup, no download, no watermarks.
Open Free ToolYou Might Also Like

AI Old Photo Restorer & Colorizer: How to Bring Faded Family Photos Back to Life
Old family photos fade, scratch, and lose their color over time—but they don't have to stay that way. Learn how to use PicDitt's free AI Old Photo Restorer & Colorizer to remove damage, enhance details, and add realistic color to black & white images, all directly in your browser.
Read More →
Fix Sideways Photos: How to Rotate and Straighten Images Online Instantly (Free)
Learn how to fix sideways photos, rotate images, and straighten pictures online instantly using a free tool. No signup required, works on any device.
Read More →
Make Your Photos Look Professional: How to Blur Backgrounds Online (Free Bokeh-Style Look)
Learn how to blur backgrounds for a clean “portrait mode” look—or blur faces, text, and license plates for privacy. Use Picditt’s Blur Image Online tool to get professional blur effects instantly, fully in your browser.
Read More →