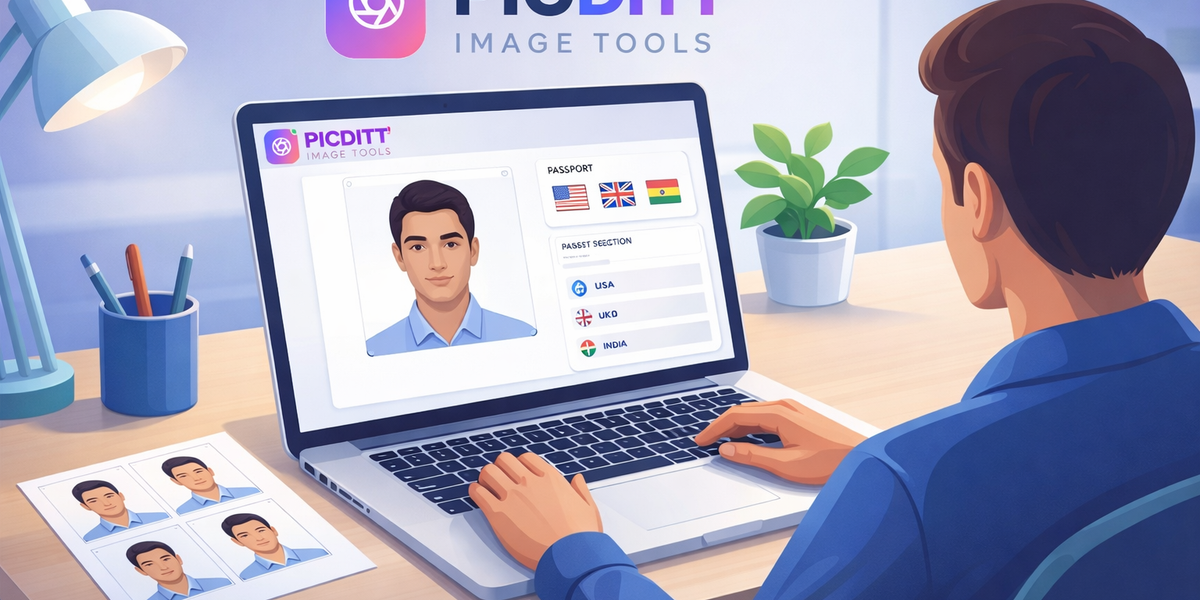
How to Make a Passport Photo at Home Free — Meets Official Requirements for 50+ Countries
Advertisement
How to Make a Passport Photo at Home Free — Meets Official Requirements for 50+ Countries
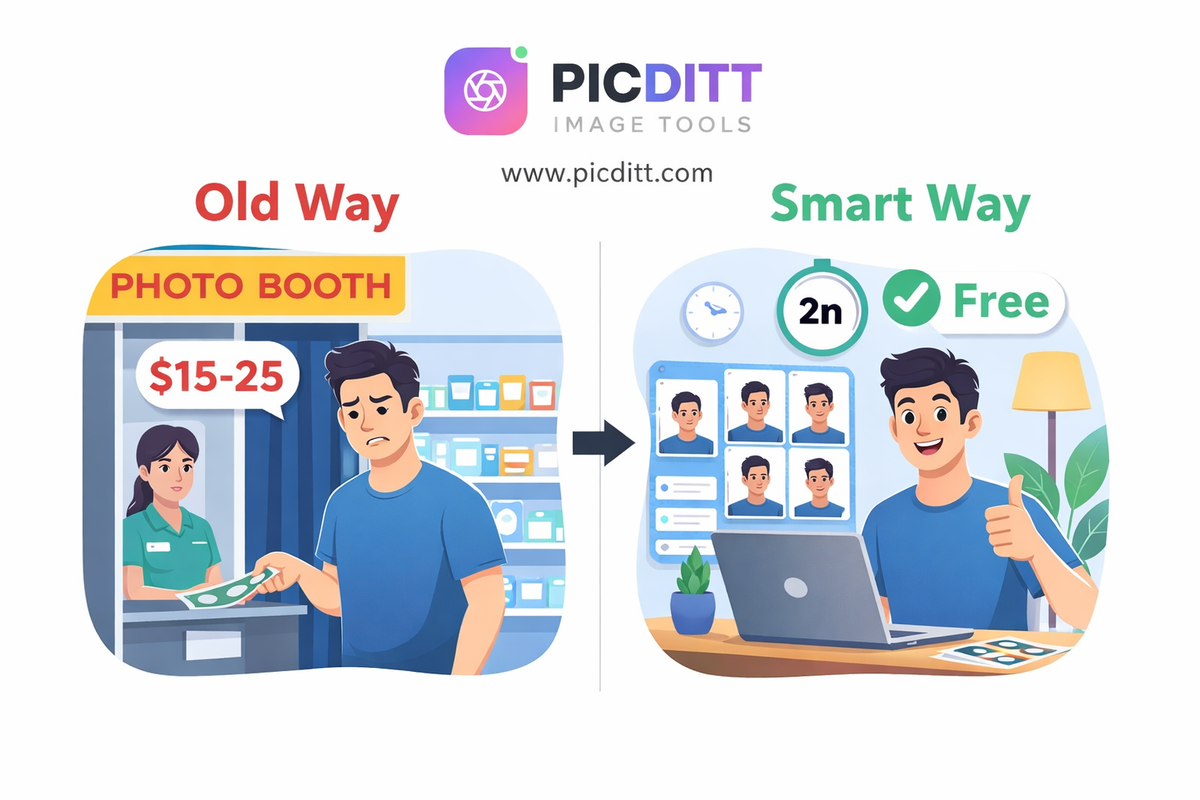
The last time you needed a passport photo, you probably drove to a pharmacy, waited in line, paid somewhere between $15 and $25, and walked out with two small photos — at least one of which had unflattering lighting and a shadow behind your head.
There is a better way.
Modern smartphone cameras are more than capable of producing passport photos that meet official government requirements. The technology to resize, crop, adjust background, and format those photos to exact country specifications now runs entirely in your browser — free, instantly, and without uploading your photo anywhere.
The only thing standing between you and a free, professional passport photo is knowing the requirements and having the right tool.
This complete guide covers everything: the official requirements for the world's most commonly needed passport photos, the mistakes that get photos rejected, how to take a perfect passport photo at home, and how to use the free Picditt Passport Photo Maker to create print-ready photos that meet official specifications for 50+ countries.
Why Passport Photos Get Rejected — And How to Avoid It
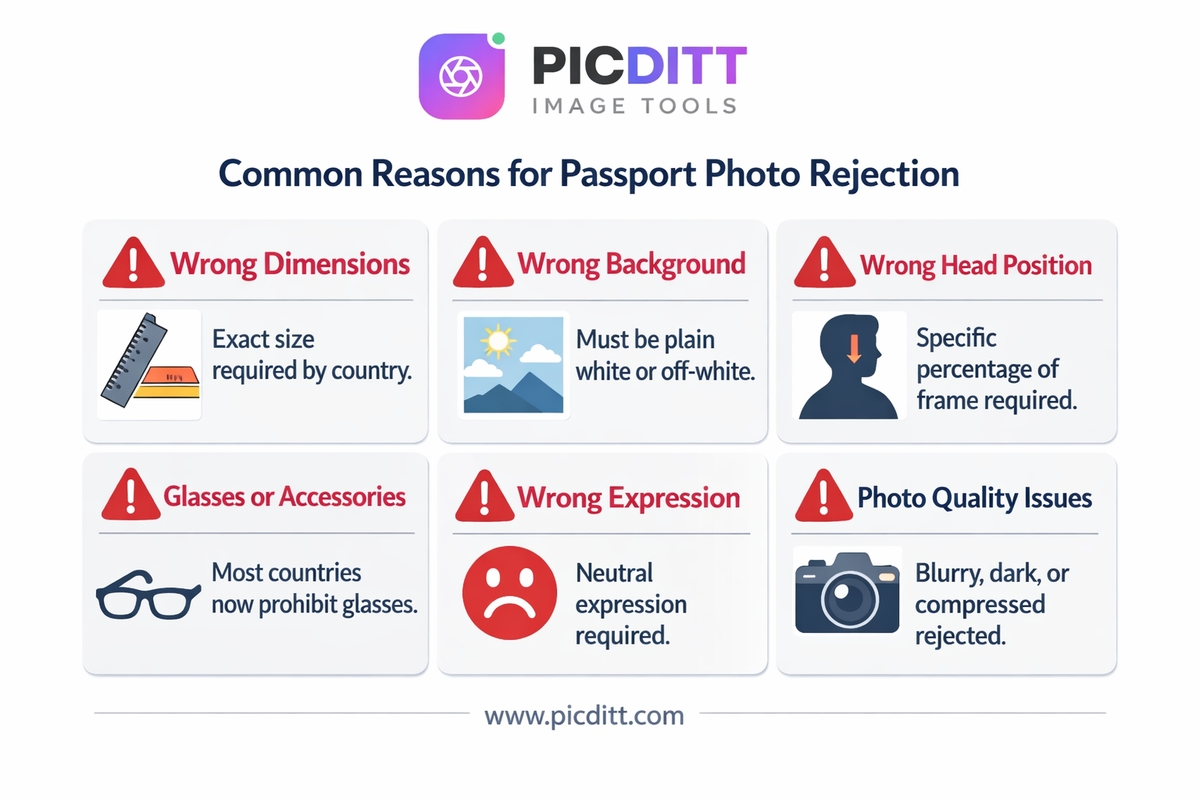
Before anything else, understand what causes rejection. Government passport offices and visa processing centers reject photos for specific, documented reasons. Knowing these in advance eliminates every preventable rejection.
Rejection Reason 1: Incorrect Dimensions
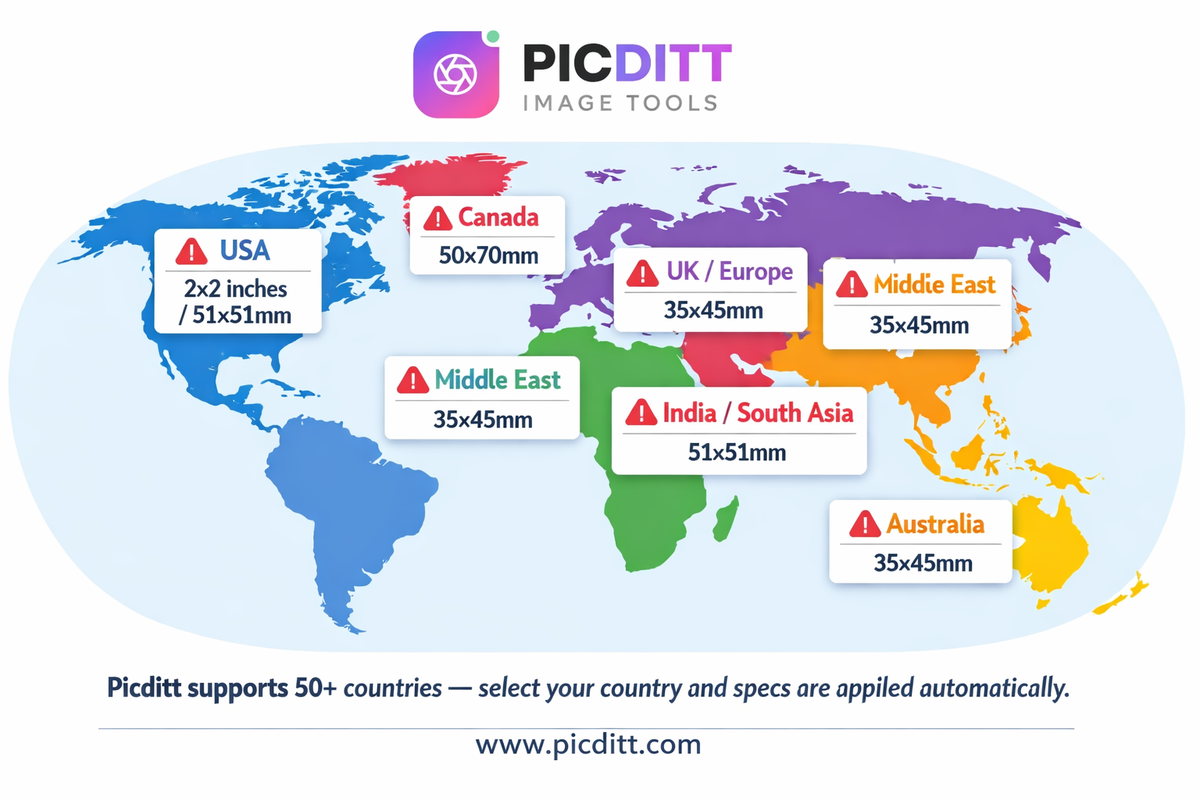
Every country specifies exact photo dimensions. The United States requires 2×2 inches (51×51mm). The United Kingdom requires 35×45mm. India requires 35×45mm. These are not suggestions — submitting the wrong size is an automatic rejection.
The Picditt Passport Photo Maker stores the exact official specifications for 50+ countries and automatically formats your photo to the correct dimensions when you select your country.
Rejection Reason 2: Wrong Background Color
Most countries require a plain white or off-white background. Some countries accept light gray. A few specific visa types accept other colors. Photos with visible furniture, walls, patterns, or shadows in the background are routinely rejected.
The tool's background removal and replacement feature replaces any background with the correct official color for your selected country.
Rejection Reason 3: Incorrect Head Size and Position
Every country specifies what percentage of the photo the head should occupy and exactly where it should be positioned. The US requires the head to be between 1 and 1⅜ inches (25–35mm) tall in the photo, centered horizontally, and positioned so eyes appear between 56% and 69% of the image height from the bottom.
These specifications exist to ensure facial recognition algorithms work correctly on ID documents. Photos where the head is too small, too large, tilted, or off-center are rejected.
Rejection Reason 4: Glasses, Shadows, and Accessories
Most countries now prohibit glasses in passport photos entirely. Head coverings are prohibited unless worn for documented religious reasons. Shadows on the face or background — even subtle ones — cause rejection. Headphones, jewelry that obscures facial features, and clothing that blends with the background are also common rejection causes.
Rejection Reason 5: Expression and Eyes
A neutral expression with mouth closed is required by virtually all countries. Eyes must be fully open, clearly visible, and looking directly at the camera. Photos where the subject is smiling, squinting, or looking away are rejected.
Rejection Reason 6: Photo Quality Issues
Blurry photos, photos with red-eye, photos that are too dark or too bright, and photos with compression artifacts are all rejection causes. The photo must be in sharp focus with natural, even skin tones.
Official Passport Photo Requirements by Country
Here are the official specifications for the most commonly needed passport photos worldwide. The Picditt Passport Photo Maker includes all of these in its preset library.
United States (USA)
Specification
Requirement
Size
2×2 inches (51×51mm)
Head size
1–1⅜ inches (25–35mm) from chin to top of head
Background
Plain white or off-white
Expression
Neutral, mouth closed
Glasses
Not permitted (since 2016)
Head coverings
Not permitted (religious exception applies)
Recency
Taken within last 6 months
Format
Color, JPEG or print
United Kingdom (UK)
Specification
Requirement
Size
35×45mm
Head height
29–34mm (64–80% of frame)
Background
Plain cream or light grey
Expression
Neutral, mouth closed
Glasses
Not permitted
Eyes
Open, clearly visible
Canada
Specification
Requirement
Size
50×70mm
Head height
31–36mm
Background
Plain white
Expression
Neutral
Glasses
Permitted if no glare or tinted lenses
India
Specification
Requirement
Size
51×51mm (2×2 inches)
Background
Plain white
Expression
Neutral, mouth closed
Head covering
Not permitted (religious exception applies)
Recency
Taken within last 6 months
Australia
Specification
Requirement
Size
35×45mm
Head height
32–36mm
Background
Plain white or light grey
Expression
Neutral
Glasses
Not permitted
UAE and Gulf Countries
Specification
Requirement
Size
35×45mm (most Gulf states)
Background
Plain white
Expression
Neutral
Head covering
Permitted for religious reasons
Color
Color photo required
Schengen Visa (EU Travel)
Specification
Requirement
Size
35×45mm
Head height
32–36mm
Background
Plain white or light grey
Expression
Neutral, mouth closed
Glasses
Not permitted
Recency
Taken within last 6 months
How to Take a Perfect Passport Photo at Home
Taking your own passport photo requires attention to four key factors: lighting, background, positioning, and camera settings. Getting these right produces a photo that requires minimal editing and passes official requirements.
Step 1: Set Up Your Background
The ideal background is a plain white wall or a large white sheet hung flat against a wall. Key requirements:
What works:
- Smooth white or off-white painted wall
- White foam board or poster board held behind the subject
- White bedsheet hung flat without wrinkles
What does not work:
- Patterned wallpaper
- Walls with artwork or decoration visible
- Any background with shadows
Pro tip: If you cannot find a completely plain white background, the Picditt Passport Photo Maker's background removal feature can replace any background with the official white color automatically.
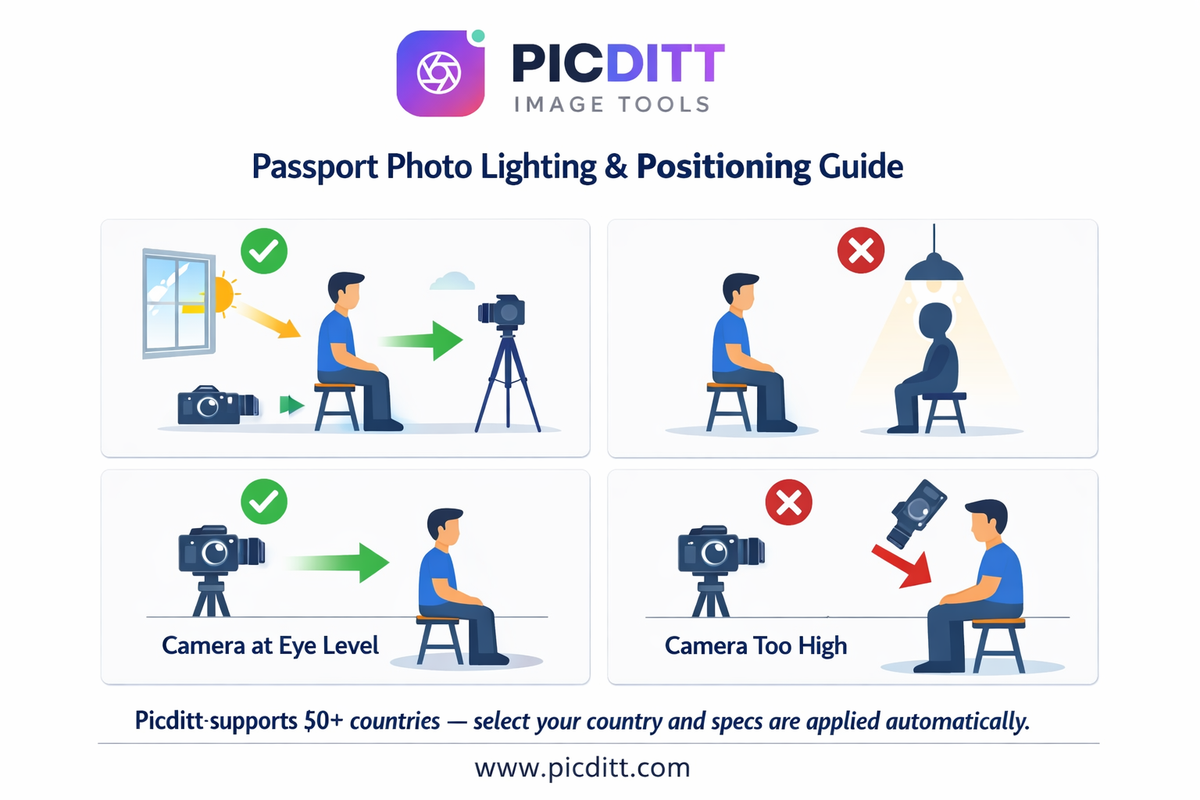
Step 2: Get the Lighting Right
Lighting is the most technically challenging aspect of home passport photography. Official photos require even, shadow-free illumination across the face.
Best lighting setup:
- Natural daylight from a window positioned to the side of the subject (not directly behind or in front)
- Two light sources on opposite sides of the subject to eliminate shadows
- Position the subject at least one meter from the background to prevent shadows falling on it
- Avoid direct sunlight which creates harsh shadows and overexposure
What to avoid:
- Overhead lighting only (creates shadows under eyes, nose, and chin)
- Lighting from below (unnatural appearance)
- Flash photography (often creates red-eye and harsh shadows)
- Backlighting (silhouettes the subject)
Step 3: Position Yourself Correctly
Camera height: Position the camera or phone at eye level — not above or below. Shooting from above creates unflattering distortion. Shooting from below is not acceptable for passport photos.
Distance: Stand approximately 1–1.5 meters from the camera. This distance allows enough of the upper body and full head to be captured without distortion from a wide-angle lens.
Posture: Sit upright or stand straight. Keep your head level — do not tilt left, right, forward, or back. Look directly into the camera lens, not at your reflection on the screen.
Expression: Maintain a neutral expression with your mouth closed and eyes fully open looking directly at the camera.
Step 4: Take Multiple Shots
Take 10–15 photos in the same session. Blink timing, subtle expression changes, and slight head movements vary between shots. Having multiple options allows you to select the best one for processing.
Review for: Sharp focus (especially eyes), even lighting, neutral expression, head centered and level, no visible shadows.
Step 5: Choose the Best Photo
Select the sharpest, most evenly lit photo from your session. The best passport photos typically have:
- Eyes clearly visible and in focus
- Even skin tones without harsh shadows
- Natural coloring without overexposure
- Head perfectly centered and level
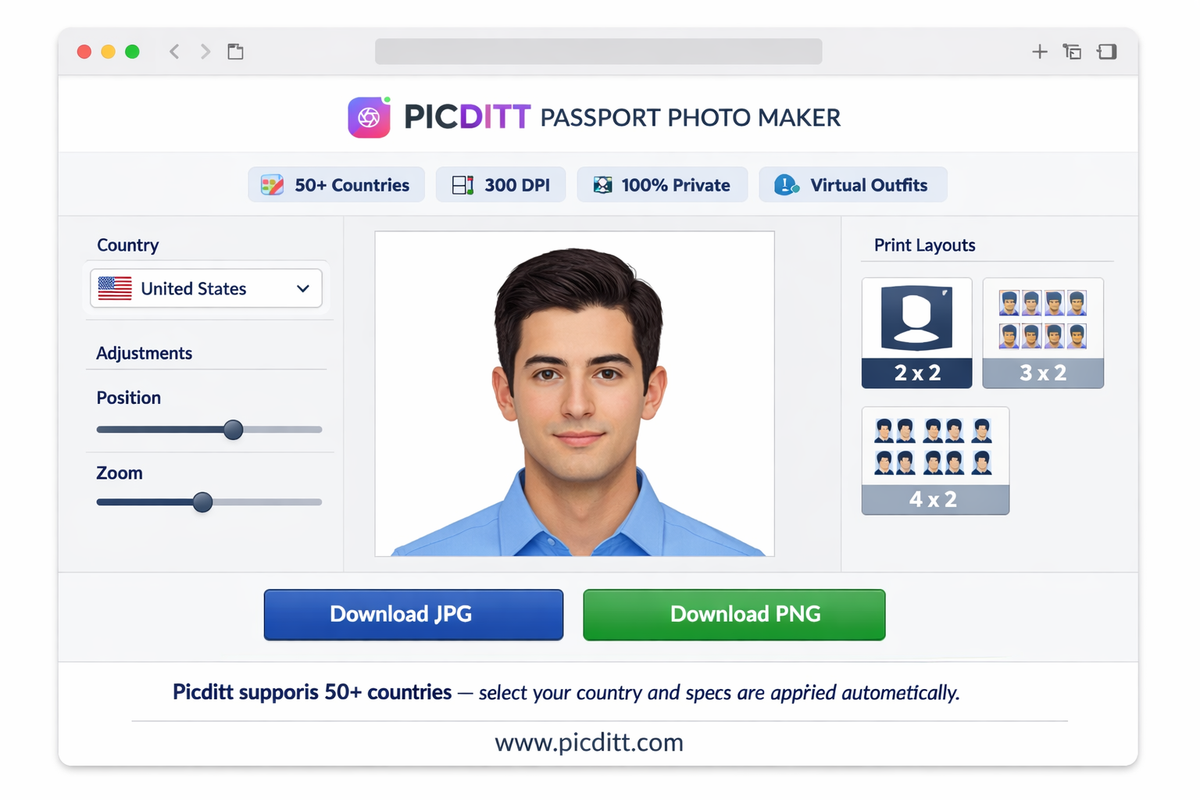
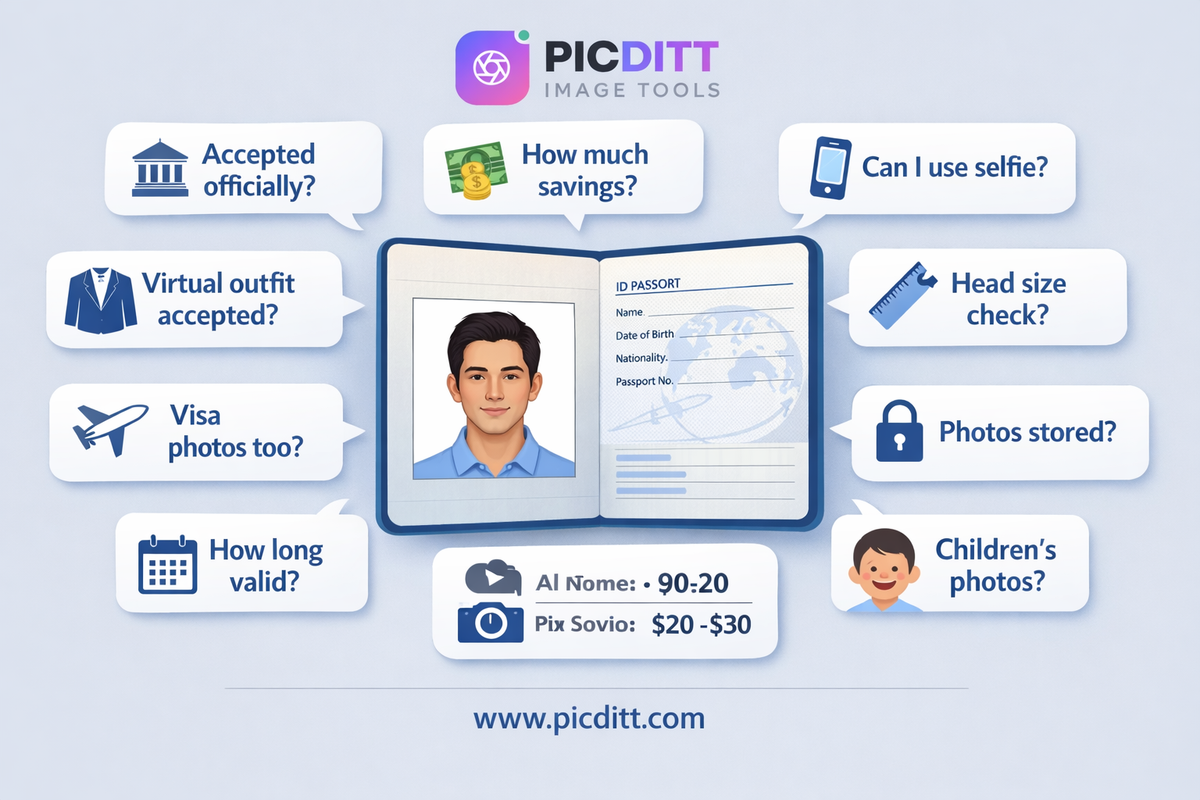
Introducing the Picditt Passport Photo Maker
The Picditt Passport Photo Maker is a free, browser-based tool that transforms any suitable photo into a properly formatted, print-ready passport photo — with official specifications for 50+ countries built in, background replacement, virtual outfit addition, and 100% private local processing.
Why Privacy Matters for Passport Photos
Passport photos are sensitive biometric data. They are used as primary identity verification by government agencies, border control systems, and official identification databases. Uploading your passport photo to a server operated by an unknown company creates unnecessary privacy risk.
The Picditt Passport Photo Maker processes everything 100% in your browser. Your photo loads into browser memory, all adjustments happen locally, and the final formatted image downloads directly to your device. Your photo is never transmitted to any server — making it the most secure option for processing sensitive ID document photos.
Key Features
50+ Country Presets
Select your country from the preset library and the tool automatically applies the correct dimensions, head size requirements, and background color. Countries include USA, UK, Canada, Australia, India, Germany, France, Japan, China, UAE, Saudi Arabia, and all Schengen visa countries.
Automatic Background Replacement
The tool detects and replaces your background with the official plain white or specified color for your selected country — no manual editing required.
Virtual Outfit Addition
Add professional suits, blazers, shirts, dresses, or hijabs to your passport photo virtually. Perfect for achieving a formal, professional appearance without needing to change clothes. The smart positioning system ensures natural-looking results.
Real-Time Adjustment
Adjust face position, zoom level, and composition in real time with a live preview showing exactly how the final photo will look against official specifications.
High-Resolution Export at 300 DPI
Output at 300 DPI — the standard required for professional printing. This resolution ensures sharp, clear photos when printed at passport photo dimensions.
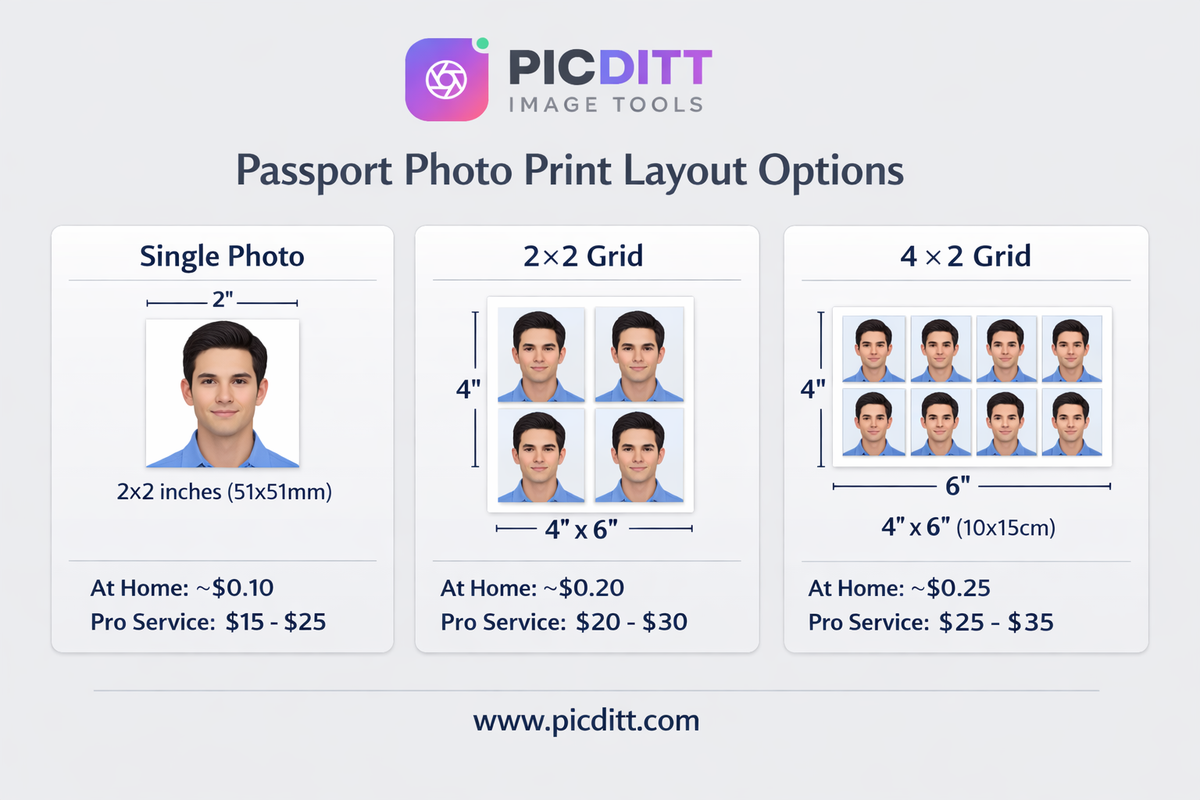
Multiple Print Layouts
Choose from single photo, 2×2, 3×2, or 4×2 layouts for printing multiple copies on a single sheet — ready for home printing or professional print services.
JPG and PNG Output
Download in JPG for standard printing or PNG for lossless quality. Both formats are accepted by all official passport photo submission processes.
Technical Specifications
Specification
Details
Input Formats
JPG, PNG, WebP
Maximum Input Size
10 MB
Output Resolution
300 DPI
Output Formats
JPG, PNG
Print Layouts
Single, 2×2, 3×2, 4×2
Country Presets
50+ countries with official specs
Background
Automatic replacement
Virtual Outfits
Suits, blazers, shirts, dresses, hijabs
Processing
100% browser-based (client-side)
Privacy
Photos never uploaded to any server
Cost
Free forever
Registration
None required
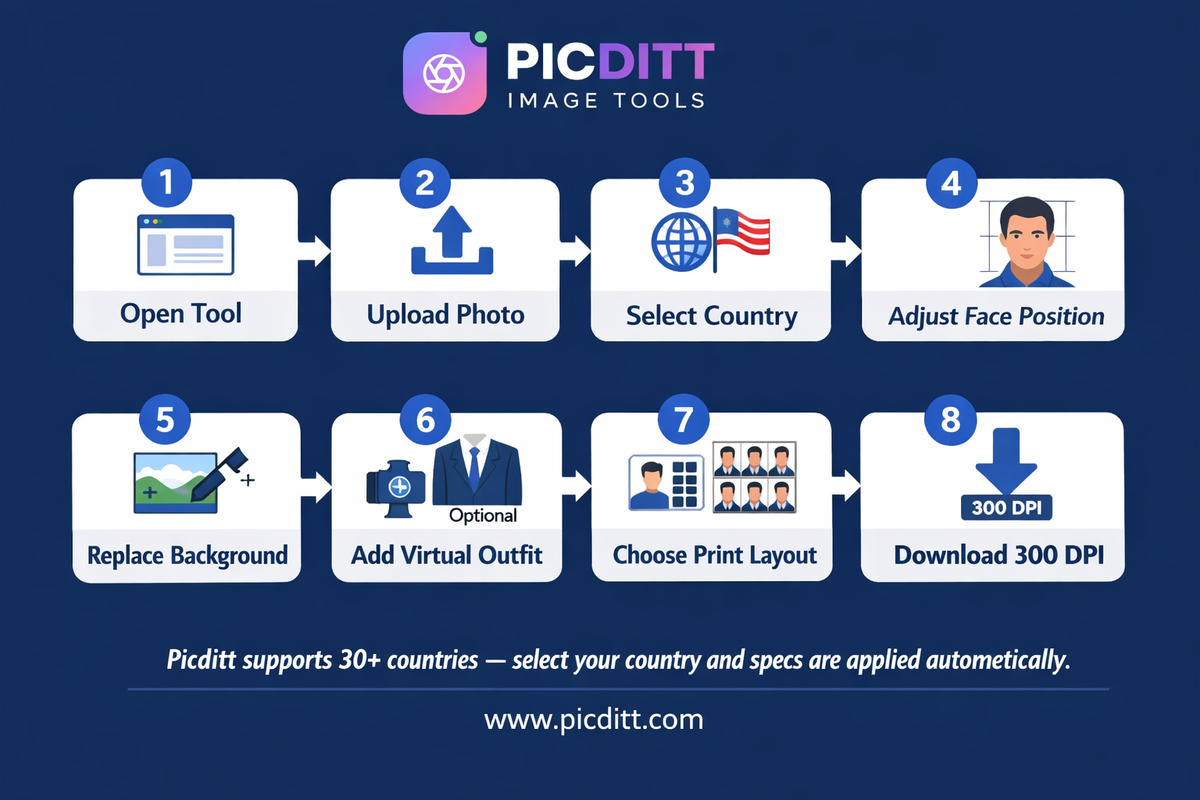
Step-by-Step Guide: Creating Your Passport Photo
Step 1: Open the Tool
Visit https://picditt.com/passport/maker in any modern browser. Works on desktop and mobile. No account or installation required.
Step 2: Upload Your Photo
Click "Upload Your Photo" or drag and drop your image onto the upload area. For best results use a photo taken following the home photography guidelines above — clear face, good lighting, plain background or no background.
Supported formats: JPG, PNG, WebP up to 10 MB.
Step 3: Select Your Country
Open the country selector and choose the country your passport or visa is for. The tool instantly applies:
- Correct photo dimensions
- Correct head size requirements
- Correct background color
- Correct output resolution
For Schengen visas, select the specific country you are applying to — requirements can vary slightly between EU member states.
Step 4: Adjust Your Photo
Use the real-time adjustment controls to:
- Position your face — center your head within the frame guidelines
- Adjust zoom — ensure your head size meets the country's head-to-frame ratio requirement
- Fine-tune position — make sure your eyes align with the target eye position guide
The live preview updates in real time showing exactly how your photo will appear in the final output.
Step 5: Background Replacement
If your original photo has any background other than plain white, the tool's automatic background replacement removes it and applies the correct official background color. Review the result and adjust if needed.
Step 6: Add Virtual Outfit (Optional)
If your photo was taken in casual clothing, use the virtual outfit feature to add a professional appearance:
- Select from suits, blazers, shirts, dresses, or hijabs
- The smart positioning system places the outfit naturally on your photo
- Adjust sizing and position for the most natural look
This feature is particularly useful for visa applications where a formal appearance is expected or when taking photos at home without access to formal clothing.
Step 7: Select Print Layout
Choose your preferred print layout:
- Single — one photo for digital submission
- 2×2 — four photos on one sheet (most common for US passport)
- 3×2 — six photos on one sheet
- 4×2 — eight photos on one sheet
The layout automatically sizes your photos correctly for the selected country's dimensions.
Step 8: Download Your Photos
Click Download JPG or Download PNG to save your print-ready passport photo sheet to your device. The file downloads instantly at 300 DPI, ready for home printing or upload to a professional print service.
Printing Your Passport Photos at Home
Creating the digital photo file is only half the process. Printing correctly ensures the physical photo meets all submission requirements.
Home Printer Requirements
Paper: Use glossy or semi-glossy photo paper — the same type used by commercial photo print services. Matte paper is generally not accepted for passport photos.
Resolution: Print at the maximum quality setting your printer supports. For passport photos this means 300 DPI minimum — which the Picditt tool's output already provides.
Color calibration: Ensure your printer's color settings are configured for accurate skin tone reproduction. Most modern printers have a "photo" or "vivid" print mode that handles this automatically.
Cutting: After printing, cut photos precisely along the guide lines. Use a sharp scissors or a photo trimmer for clean, straight edges. Torn or rough edges can cause rejection.
Professional Printing Alternative
If you do not have a photo-quality printer, you can take your downloaded file to any of these print services:
- Walgreens — accepts digital photo files, prints at passport size
- CVS Photo — same-day passport photo printing
- Walmart Photo Center — low-cost photo printing
- Costco Photo Center — high quality at low cost
- Staples — same-day printing with various sizes
Printing at a professional service typically costs $0.25–$1 per print — significantly less than the $15–25 for a full passport photo service.
What to Do If Rejected
If your passport photo is rejected despite following all guidelines:
- Read the rejection reason carefully — rejection notices specify exactly which requirement was not met
- Retake the photo addressing the specific issue mentioned
- Use the tool again with the same country preset to reformat
Common post-rejection fixes:
- Brighter, more even lighting eliminates shadow rejection
- More precise head centering fixes position rejection
- Better camera focus fixes sharpness rejection
Frequently Asked Questions
Is a home-made passport photo accepted by government agencies?
Yes, if it meets the official specifications. Passport authorities evaluate the photo itself — not where it was created. As long as your photo meets all the dimension, background, expression, and quality requirements for your country, it will be accepted whether it was taken at a pharmacy or at home.
How much can I save by making my passport photo at home?
In the United States, professional passport photo services at pharmacies and post offices typically charge $15–$25. Making your own at home costs only the price of printing — approximately $0.25–$1 at a professional print center, or the cost of a sheet of photo paper if printing at home. For a family of four applying for passports simultaneously, this saves $60–$100.
Can I use a selfie for my passport photo?
Not directly. Selfies taken with your arm extended create unflattering perspective distortion and are almost always the wrong composition for passport photos. However, you can use your phone camera if someone else takes the photo, or if you use a phone stand to position the camera at eye level and trigger the shutter with a self-timer or Bluetooth remote.
What is the virtual outfit feature and is it accepted?
The virtual outfit feature digitally adds professional clothing to your passport photo. While there is no official prohibition on virtually added clothing, the clothing must appear natural and realistic. The tool's smart positioning system is designed to produce natural-looking results. For peace of mind with critical applications, wearing actual formal clothing when taking your photo is always the safest approach.
How do I know my photo meets the head size requirement?
When you select your country in the Picditt Passport Photo Maker, the tool displays face position guidelines showing exactly where your head should appear in the frame. Position your face so it fills the indicated area and the tool will automatically apply the correct head-to-frame ratio for your country's specifications.
Can I use this tool for visa photos as well as passport photos?
Yes. Visa photos use the same basic specifications as passport photos for most countries. Select the destination country from the preset library and apply that country's specifications. For Schengen visas, the standard European 35×45mm format applies to all member states.
Are my photos stored anywhere when I use this tool?
No. All processing happens 100% within your browser using client-side JavaScript. Your photo is loaded into browser memory and never transmitted to any server. When you download the finished photo it saves directly to your device. No copy exists anywhere other than on your device.
How long are passport photos valid?
Most countries require passport photos to have been taken within the last six months. The US, UK, Canada, and Australia all specify a six-month recency requirement. If your passport application is delayed and more than six months pass, you may need to retake your photo.
Can I use this for children's passport photos?
Yes. The process is identical for children. The main challenge with children's passport photos is keeping them still and maintaining a neutral expression — taking many shots in quick succession and selecting the best one is the recommended approach. Most countries have slightly relaxed requirements for very young children (under 5) regarding eye contact and expression.
What if my country is not listed in the presets?
For countries not in the 50+ preset library, you can manually enter the dimensions specified by your country's passport authority. Check your government's official passport website for the exact specifications. The tool's custom dimension feature allows you to apply any country's requirements.
Final Thoughts: Stop Overpaying for Passport Photos
Paying $15–$25 for a passport photo service made sense when producing a correctly sized, properly formatted photo required specialized equipment and expertise. In 2025, with a smartphone camera in your pocket and free tools that know the exact specifications for 50+ countries, it makes no sense at all.
The Picditt Passport Photo Maker removes every barrier between you and a free, professional, print-ready passport photo:
- No knowledge of photo dimensions required — select your country and they are applied automatically
- No Photoshop required — background replacement and adjustment happens in one click
- No privacy concerns — your photo never leaves your device
- No cost — completely free with no watermarks or limitations
For individuals, the savings are meaningful. For families applying for passports together, the savings are significant. And for anyone who has experienced the frustration of a rejected pharmacy photo, the control of creating and previewing your own photo before printing is genuinely valuable.
Create Your Passport Photo Free — Official Specs for 50+ Countries →
Ready to Try It Yourself?
Use this tool for free — no signup, no download, no watermarks.
Open Free ToolYou Might Also Like
Convert Images to Word Free: The Only OCR Tool That Actually Supports Urdu, Pashto & 100+ Languages
Most online image-to-Word converters fail completely with Urdu, Pashto, Arabic, and other complex scripts. This complete guide covers how OCR technology works, why right-to-left language support is rare and difficult, tips for perfect results with every language, and how to use the free Picditt Image to Word converter — the only browser-based OCR tool with full Urdu, Pashto, and 100+ language support that processes everything locally with zero server uploads.
Read More →
AI Old Photo Restorer & Colorizer: How to Bring Faded Family Photos Back to Life
Old family photos fade, scratch, and lose their color over time—but they don't have to stay that way. Learn how to use PicDitt's free AI Old Photo Restorer & Colorizer to remove damage, enhance details, and add realistic color to black & white images, all directly in your browser.
Read More →
Fix Your Profile Picture: How to Zoom and Resize Photos Online (WhatsApp, Instagram, LinkedIn)
Blurry profile picture? Wrong dimensions for Instagram, WhatsApp, or LinkedIn? This complete guide shows you how to zoom and resize any photo online for free — with 40+ platform presets, aspect ratio lock, and 100% private browser-based processing. No downloads, no sign-up, instant results.
Read More →